
I’ve been asked so many times to share all kinds of photography tips, from taking better pictures to editing them after. So, I finally did it! I even completed a series of posts aimed at improving your photography on the road… or at home. And since I am not a technical person by nature, it is my intention to provide non-technical photo tips for those of you also less technically inclined.
First, it’s important to share some fundamentals that you can refer back to before you read that series. These are non-technical photography tips for any camera – quick and dirty rules, principles, and very basic ideas to always keep in mind. These are not hard and fast rules! There are always exceptions. Learn them and then learn to break them later. Be sure to read the explanations in the captions!
These photo fundamentals are important and I refer to them again throughout the series that follows, so get a pen and paper and write this stuff down… or better yet, Pin it! There’s a handy Pinnable photo at the end of this post designed for Pinning. :)
These photo fundamentals are important and I refer to them again throughout the series that follows, so get a pen and paper and write this stuff down... or better yet, Pin it! There's a handy Pinnable photo at the end of this post… Click To Tweet
Non-technical photography tips for any camera
It’s all about the right light
1. Avoid “bad” light – This may be hard for some of you to grasp, but sunny days can be very bad for photos if you don’t know how to handle them. Direct light on a sunny day at the wrong angle can be bad because of harsh highlights and shadows. Harsh highlights and shadows together can cause too much contrast for good photos. The middle of the day is often the worst time of day for photos because that direct sunlight is pointing straight down. A good example of this is “raccoon eyes”, where a dark shadow is cast from the brows onto the eyes, making them very dark.
Quick Tip 1: Sometimes turning on your flash will put some light into those black eye holes.
Quick Tip 2: You can still take decent photos at mid-day with the right techniques, but that’s a little more advanced than what we’re learning here. Another way to take nice photos at mid-day is to find some shade.
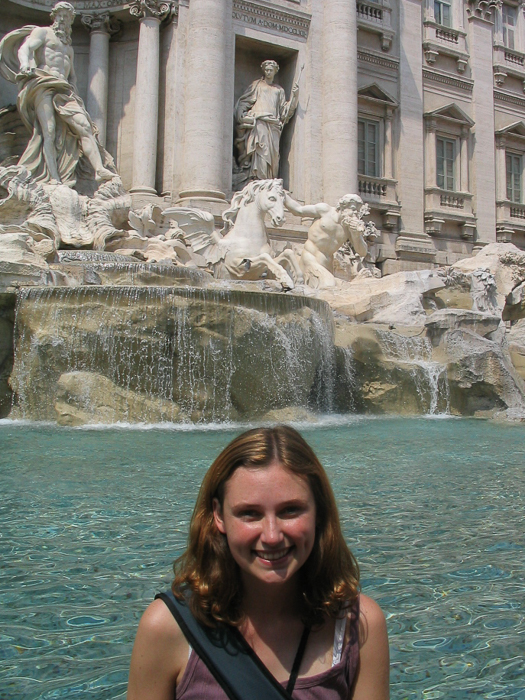
So as not to embarrass anyone else, here is a photo of me with “Raccoon Eyes”. Sometimes you simply want to document yourself in a cool place, like at the Trevi Fountain, even if it means handing your friend a camera in the worst light.
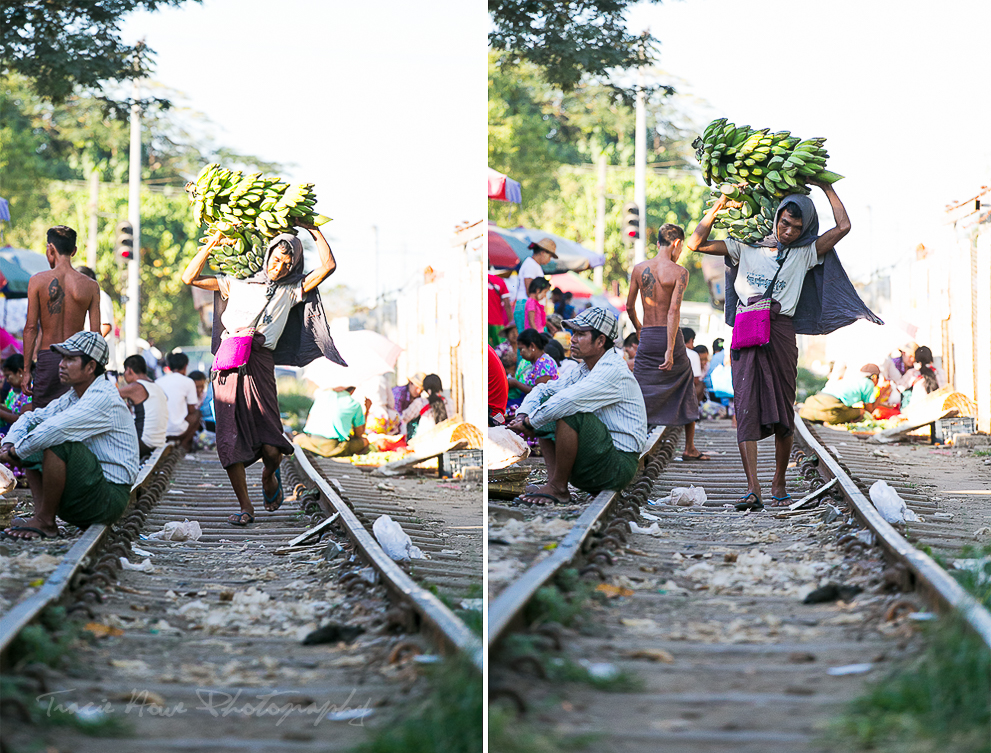
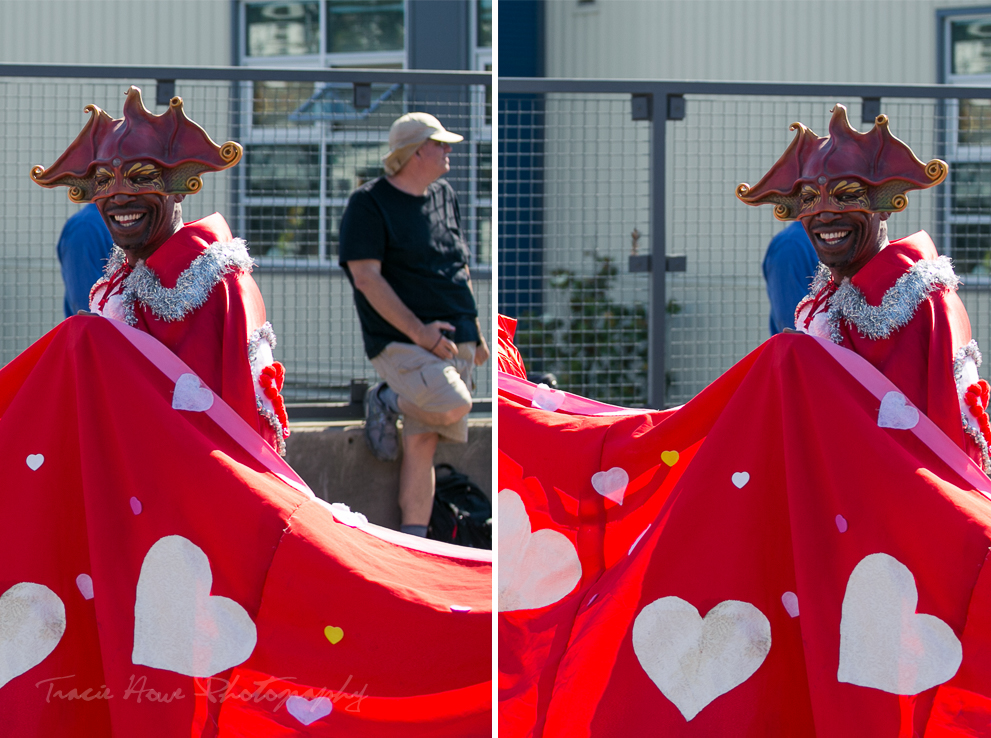
This poor guy was working hard in the middle of a hot, sunny day. You can see on the left how direct light hits his face and makes it very contrasty and too bright. In the right photo, he has come into the shade and is more evenly lit because there is no harsh light on his face.
2. Look for “good” light – When you’re avoiding the “bad” light, you’ll need to find the “good” light. Cloudy days are usually great, sometimes even at mid-day because clouds act as giant diffusers to soften the light of the sun. Soft light is “good” light. This is especially important for close up photos of people. An easy way to achieve this without the help of clouds is by finding indirect light, or open shade (where your subject is in the shade just on the edge of the bright light). The light comes in and sort of wraps itself around the subject or reflects onto it, making for a nicer photo.
Quick Tip 1: Find easy indirect light inside, next to windows.
Quick Tip 2: Sometimes cloudy days can still cast shadows, so look out for that (especially in the eyes) even if you think you’re safe with cloud cover.
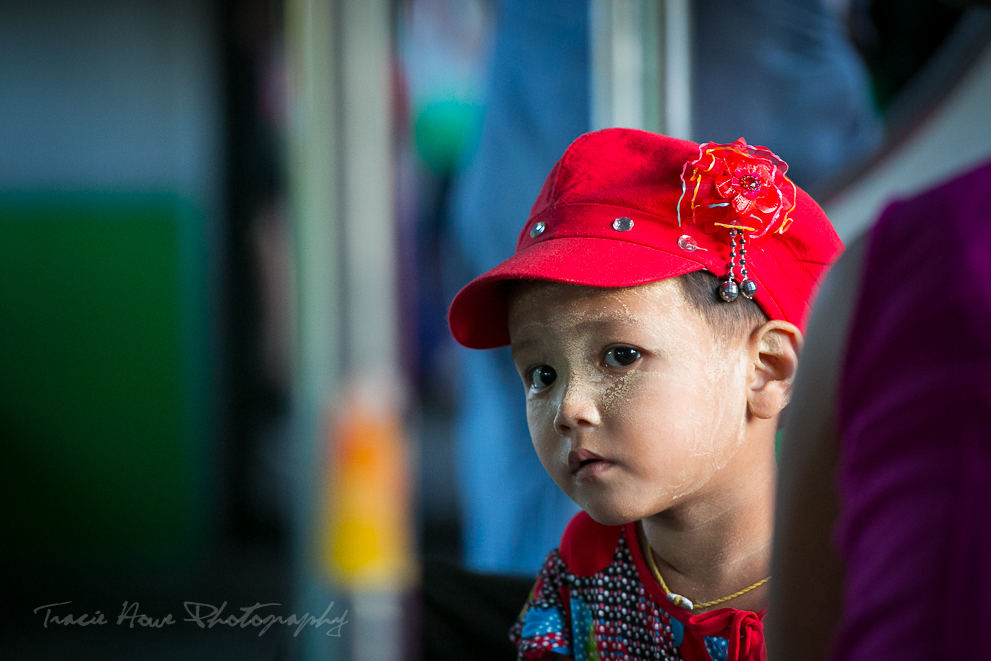
This is indirect light coming from outside the train window. Notice how it’s brighter where the light is strongest and then gradually fades, wrapping around the girl’s cute little face.
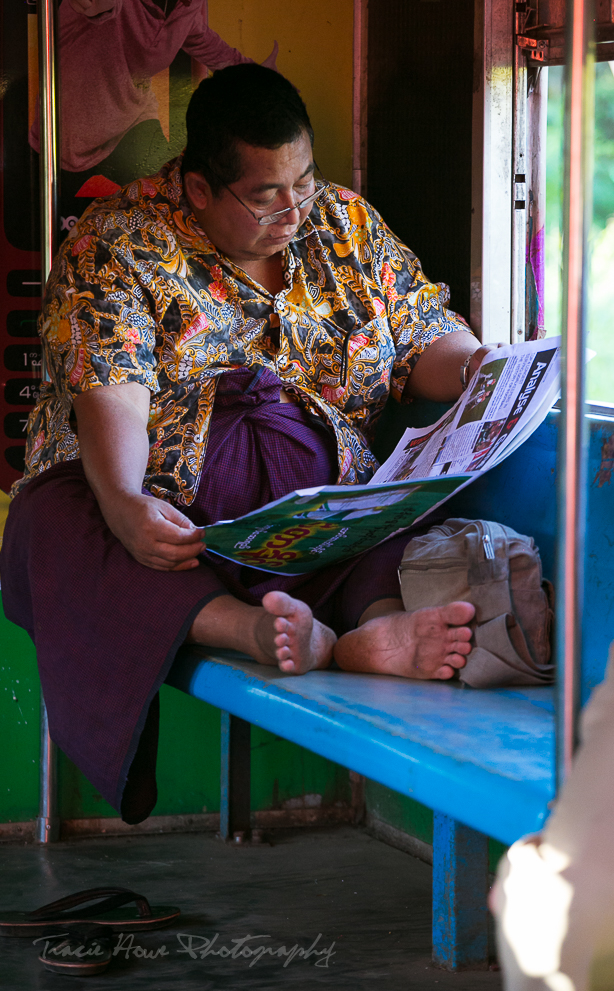
This was actually on the same train. The man’s face is turned slightly more towards the indirect light in this one, so it wraps around his face in the other direction. If the sun was shining right into the window, it would be too harsh on his face. As you can see in the lower right, someone’s leg is lit by harsh light coming directly from the opposite side of the train.
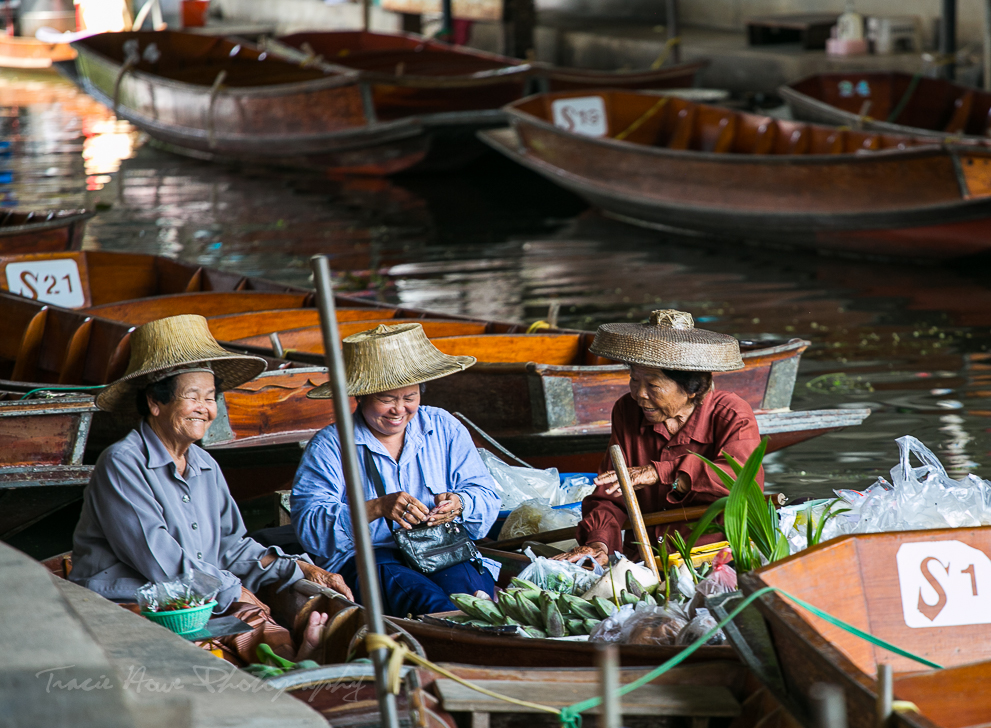
I love this photo except for that unavoidable stick! Grr! Anyway, these lovely ladies were sitting under some open shade in the middle of a hot sunny day.
3. Be ready for “Golden Hour” – Within about an hour of sunrise and sunset are the best times for beautiful color. This can work for people if you’re careful not to blast them directly with the bright light of the sun, which comes with more experience. For beginners, I recommend it more for landscapes. Everyone loves a good sunset, right?
Quick Tip 1: With the right amount of haze, you can get soft AND golden light! Take advantage of that when it happens.
Quick Tip 2: The next time you’re out shooting a sunrise or sunset, turn around and photograph the golden color behind you.
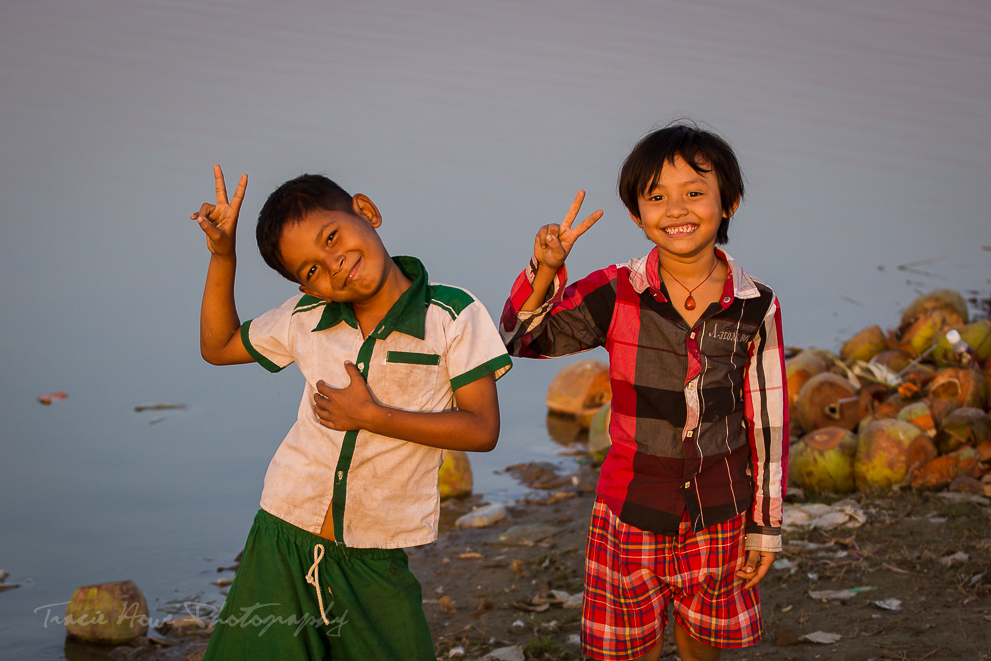
I was out photographing a hazy sunset and these kids stopped me for a cheesy photo op. Even though this is light directly from the sun, the haze softened it enough to make it work. It’s magical when you get that combination of soft and golden light.
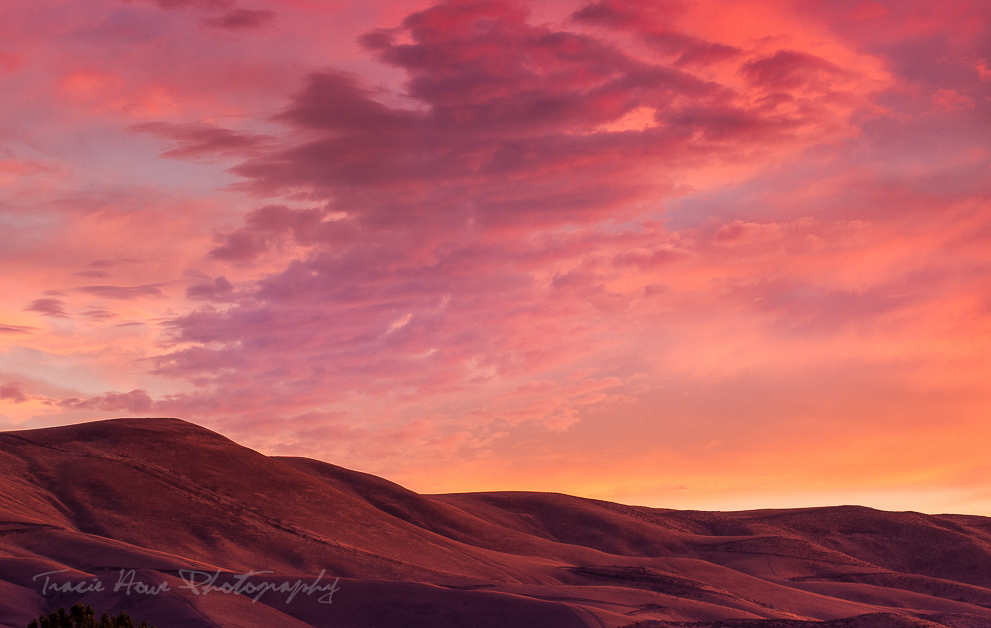
I couldn’t quite see the sunset from my position here, but these hills were lit up by its beautiful light. If I had been too focused on trying to capture the sunset itself, I would never have looked around to find this lovely alternative.
4. You need enough light – Without getting too technical here, let me quickly explain that cameras need enough light to take good photos. Period. If there isn’t already enough, you have to make there be enough. There are two main ways of doing this:
- Add artificial light – Use a flash, flashlight (torch), candle, headlights, or anything else that will give you the extra light you need. If there still isn’t enough light, your photo will be too dark and/or blurry.
- Give the camera more time to see the light that exists – In darker situations, your camera’s sensor will need more time to read the existing light than it does when there is enough light. This means that for any camera that is capable of taking long exposures (leaving the shutter open long enough to let what light you have in), you have to keep the camera stationary. This is where tripods or precarious ledges come into play. Keep the camera as still as possible, because any motion will just be a blur or streaky lights if there is anything bright in the distance.
Quick Tip 1: If it’s strong enough, the added artificial light will freeze any action that the light reaches, but nothing else beyond that. In other words, a flash will do absolutely nothing for that distant dark skyline, so turn it off if that’s all you’re shooting!
Quick Tip 2: If that’s NOT all you’re shooting, and you also want a photo of people in front of that background, then you can use your flash. You’ll still need a longer exposure to capture the background since your flash won’t reach it. So put your camera on a tripod (or the like) AND turn on the flash. This is a little more advanced.
Quick Tip 3: If you wait until it’s pitch-black to take a photo at night, then you’ll mostly get spots of lights and that’s all. Unless there happens to be a bright moon. Shoot at dusk, for an alternative with a prettier sky and less time required for that long exposure.
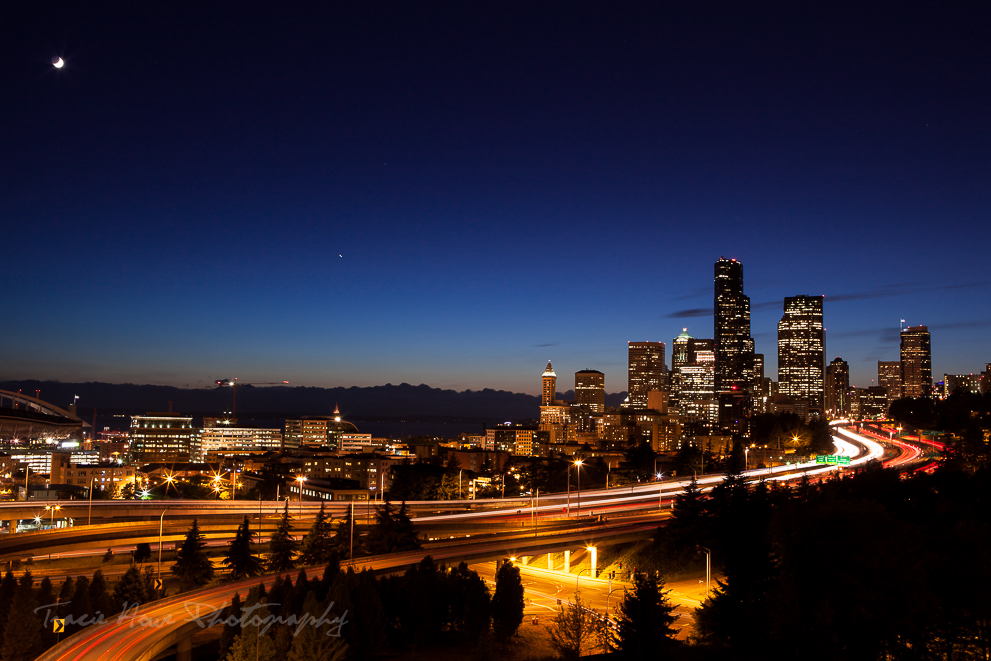
This photo required a tripod and a long exposure to keep the unmoving parts of the city sharp, while the moving lights from cars create cool streaks.
Principles of Composition
5. Make a pleasing composition – Composition is about placing the elements within a scene in an aesthetically pleasing way within the frame. This is a difficult concept to explain, but it’s essentially about how you frame your photo. For some people, composition is the trickiest aspect of learning photography, but fortunately there are a lot of principles in place to help guide them. For others, composition is more of a feeling that the image has some kind of balance or visual interest. Again, since I am not so technical, I fall into the latter group. Either way, the most commonly accepted ideas are here for you to review and hold onto should you need them. Not every photo will “fit” one of these principles, but they provide a good foundation to build upon for any aspiring photographer.
- Rule of Thirds – This one is hard to explain without visuals, so have a look at the example below before continuing…
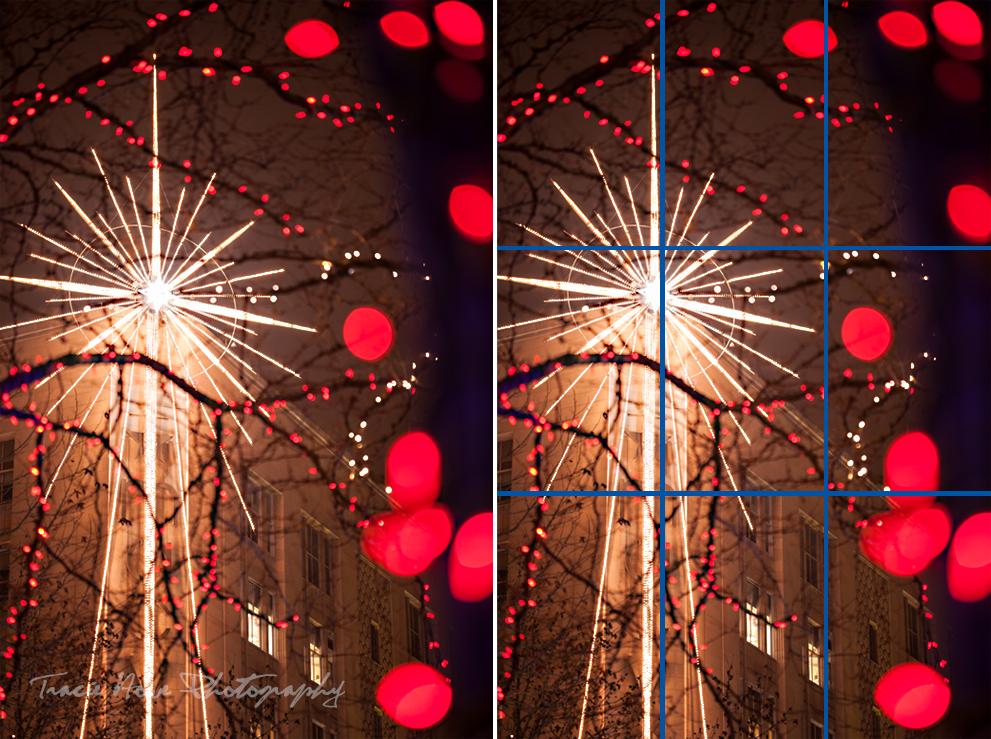 Dividing an image into 9 parts (in thirds from top to bottom and from left to right) you can see where the dissecting lines meet up with key parts of the image. Where a line is or where the lines intersect, should be a point of interest according to this idea for obtaining a pleasing composition. If I’d had enough room, I might have placed the star exactly where the lines cross, but really nothing has to be that precise. I naturally shoot this way often and I find that it’s never an exact science. Well actually, it is based on science and math, but I promised not to get into that, didn’t I? Composition is one of my strongest assets as a photographer, so I always trust my eyes to find the results that I want.
 - The Golden Spiral – A few other names describe the same principle, but I think this one is the most descriptive. It’s a spiral based on the Fibonacci Sequence which, I regret to inform you, is also math. Suffice it to say that this is similar to the math behind the rule of thirds. It’s also a difficult one to explain until you see it in action. Fortunately, as I was doing research for this post I discovered that Lightroom, my editing tool of choice, has a cool way to overlay several compositional guides to help you make a stronger image! There are a few more than what I list here, but they are all very closely related to the ones I’ve already mentioned, so I’ve decided not to bother. If you really are curious, let me know. Anyway, I was pleased to find out that one particular photo of mine met THREE of Lightroom’s compositional guidelines, so I had to take a screen shot of all of them overlayed onto it as you can see below.

Golden Spiral

Rule of Thirds

This one is called Triangle by Lightroom. I think it’s also similar to the Rule of Thirds, but with angles and diagonals.
- Leading Lines – This one is simple. Your eyes will naturally follow lines through a photo. I prefer diagonal lines myself, especially when they switch back and forth from one direction to another (that opinion may be subconsciously based on all that math!). Lines are everywhere, and if you know how to see them, you can work on placing them diagonally or otherwise.
Naturally occurring lines are found all the time in nature.
The leading lines in this image actually start with a point of interest at a third dissecting line, and then lead your eyes back and around.

This is a perfect example of leading lines. Your eyes follow the road back at a diagonal until the next point of interest catches your eyes to bring them further into the photo.
- Framing – This is exactly what it sounds like. You frame your image with something in order to zero in on the subject. This one can sometimes be hard to do well, as most beginners will be way too obvious with their frames. I recommend not framing the entire image with the same exact shape and color. Here are a few examples of frames that work.
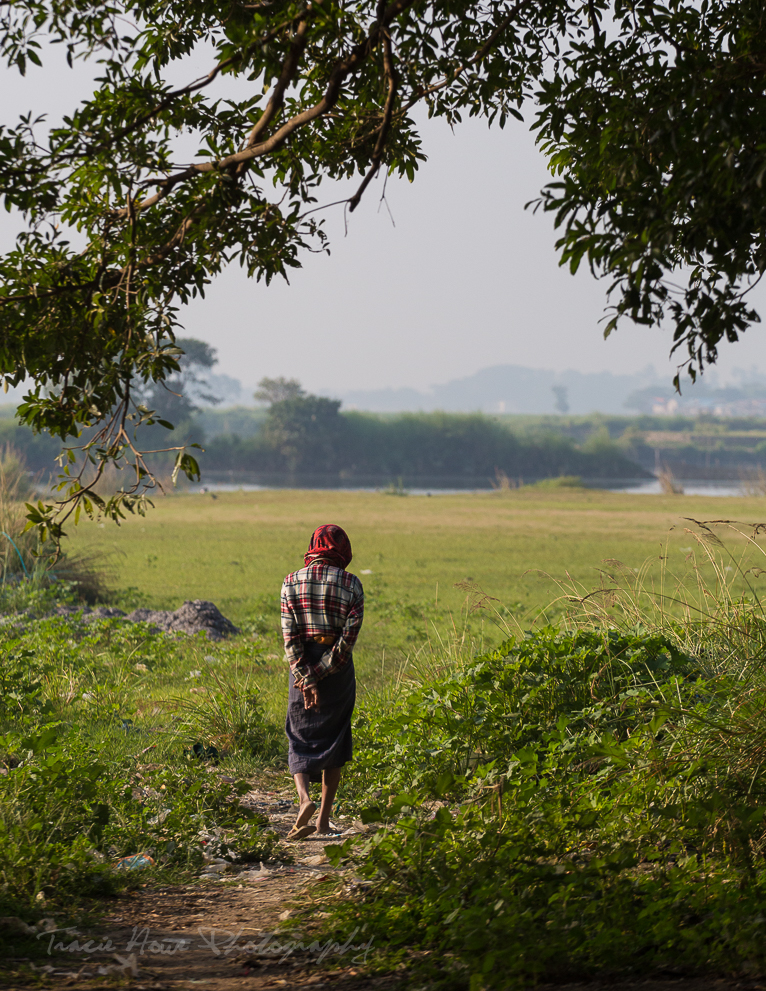
I used the tree branches and shaded grass to surround the man with a natural frame. You can slightly darken edges of a photo with a vignette to make a frame a little more evident.
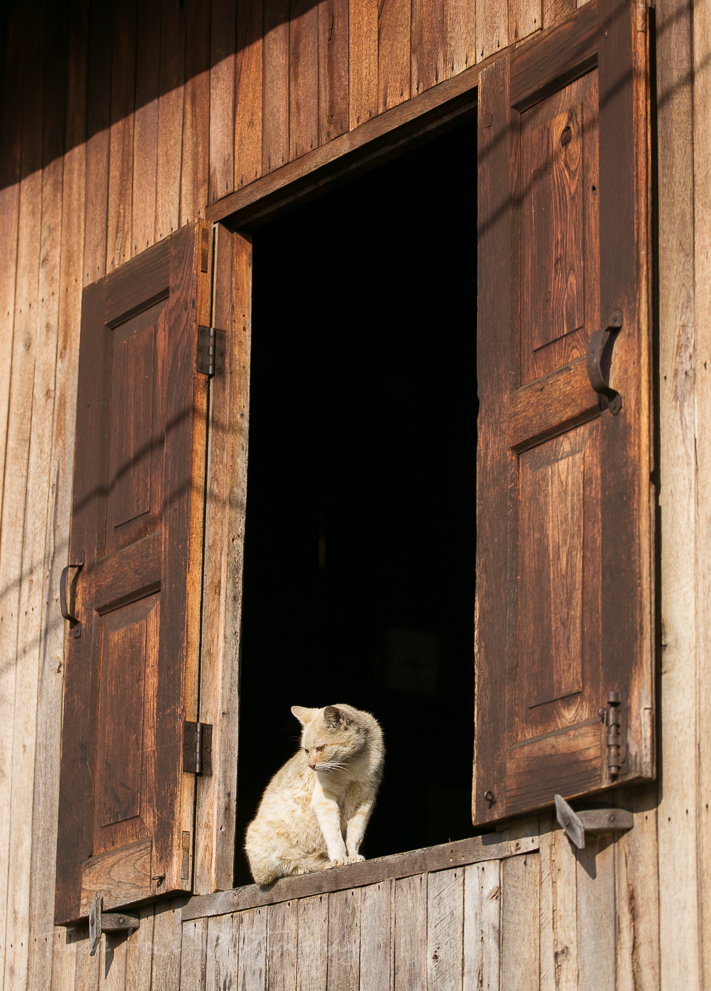
Windows are probably the easiest frames to use.
- Adjust your horizons – If your horizons often end up in the middle of a photo, you might try to change it up now and then. You’re probably doing a disservice to a spectacular sunset if half of the photo is sunset and the other half has nothing to offer but a dark boring beach, for example. Try pointing the camera slightly up in this case to feature the sky. Sometimes it’s okay to center your horizon if you have a nice foreground as well as a nice sky. Also, consider that not all photos of landscapes have to be in “landscape” orientation. Try turning your camera next time and work on keeping that horizon off center.
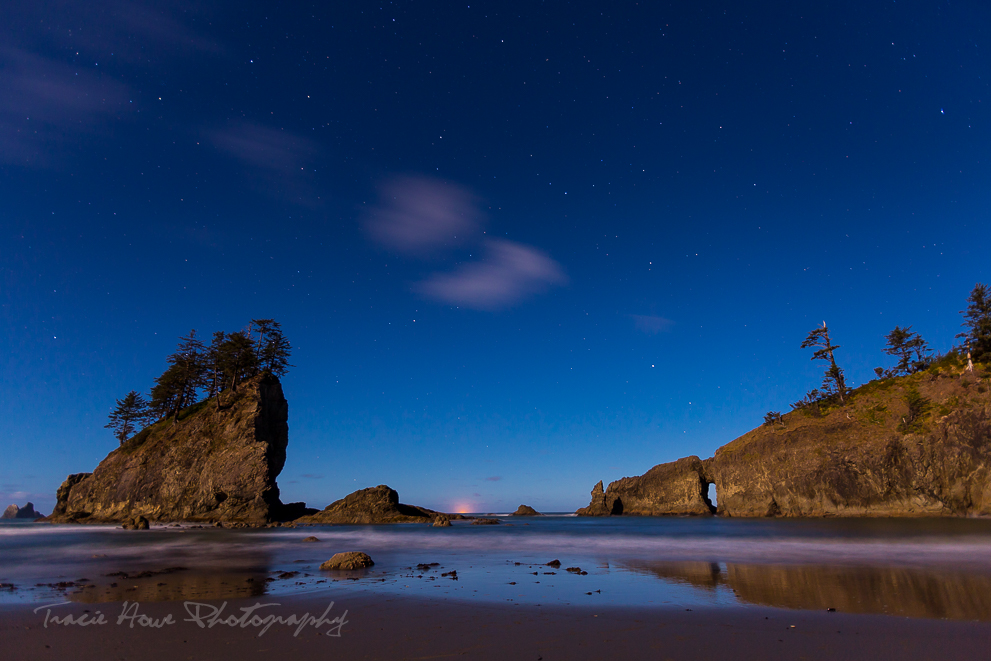
In this photo the sand beyond the reflection was not very interesting, so I opted to make the night sky more prominent.
- Patterns and textures – I am bad at putting this one into practice. Probably because I don’t photograph details as much as I should. However, in the case of photography, the beauty is often in the details! Patterns and textures can create pleasing designs for the eyes. And if you keep your eyes open, you may notice some larger patterns or textures in the distance.
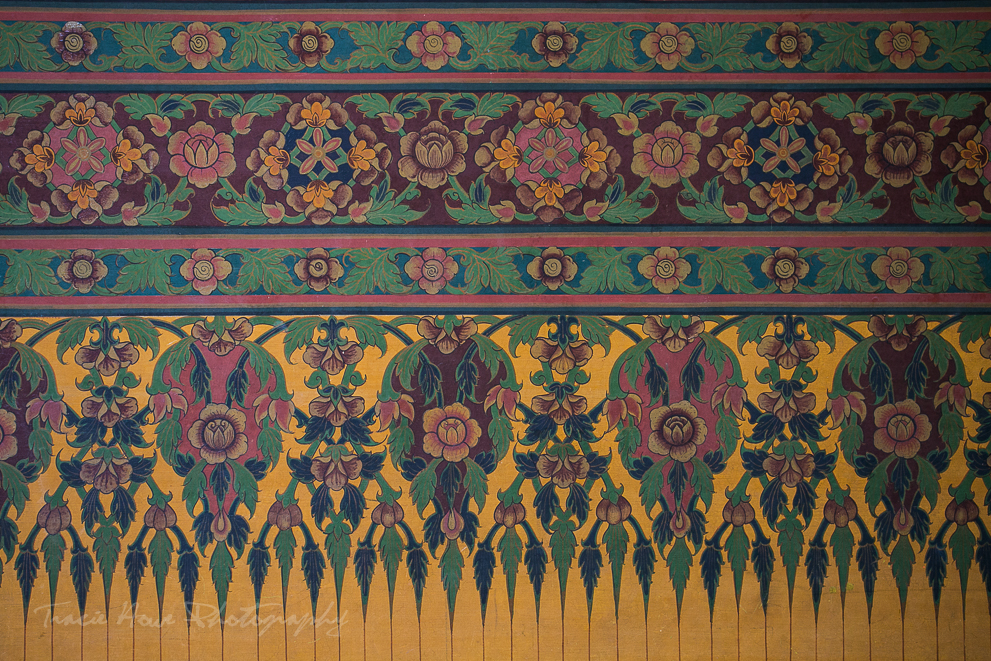
A detail of a pattern within a mural at one of Bangkok’s many elaborate temples.
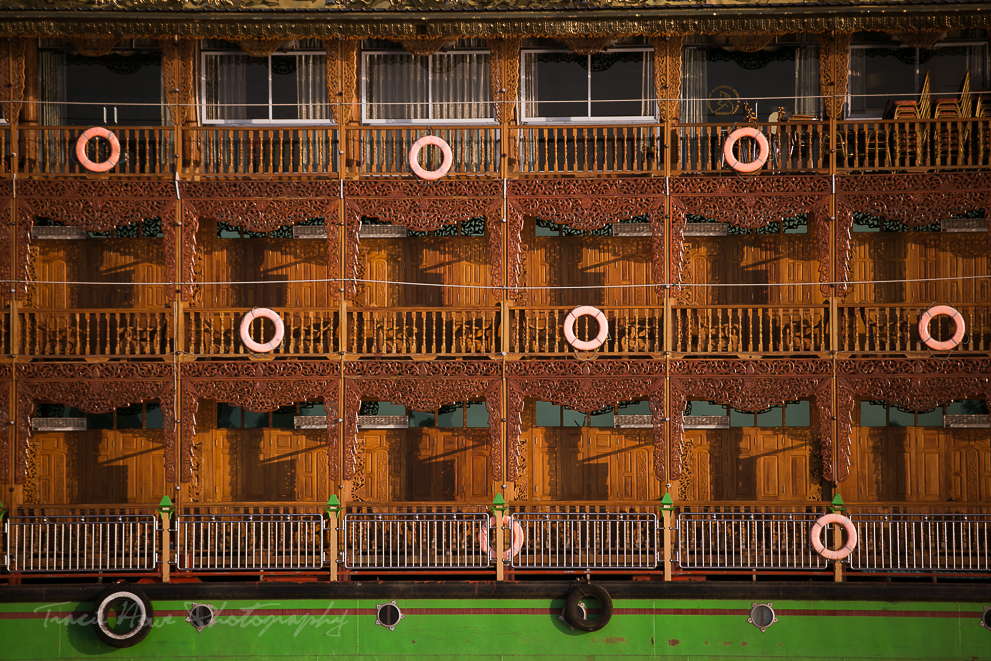
I spotted this unique pattern far away on a docked boat.
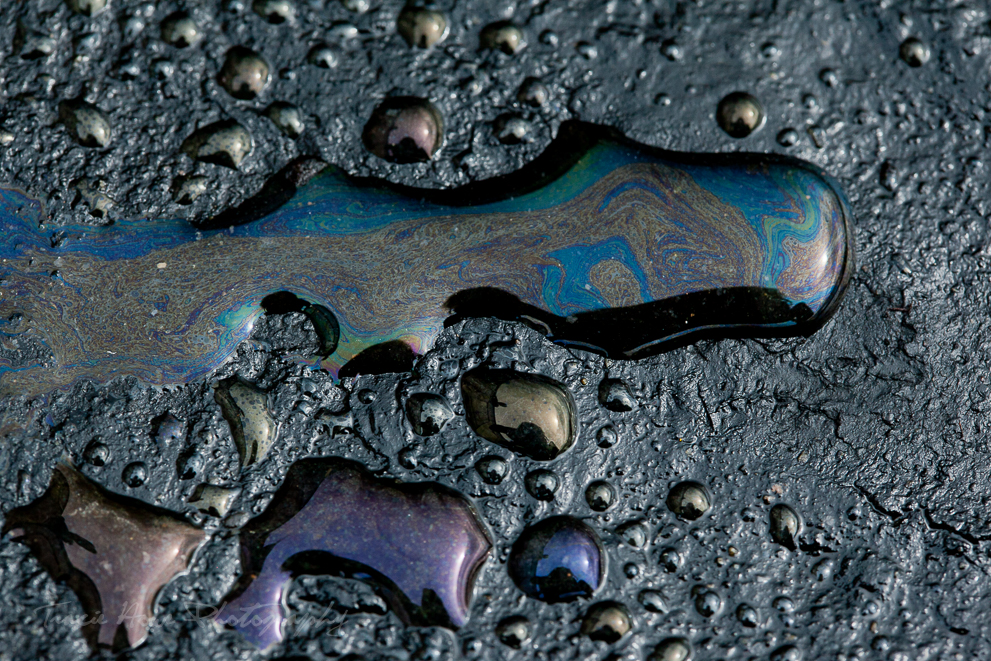
When I was really into macro photography, I noticed patterns and textures all the time. This one was a very colorful oil spill on a small area of pavement.
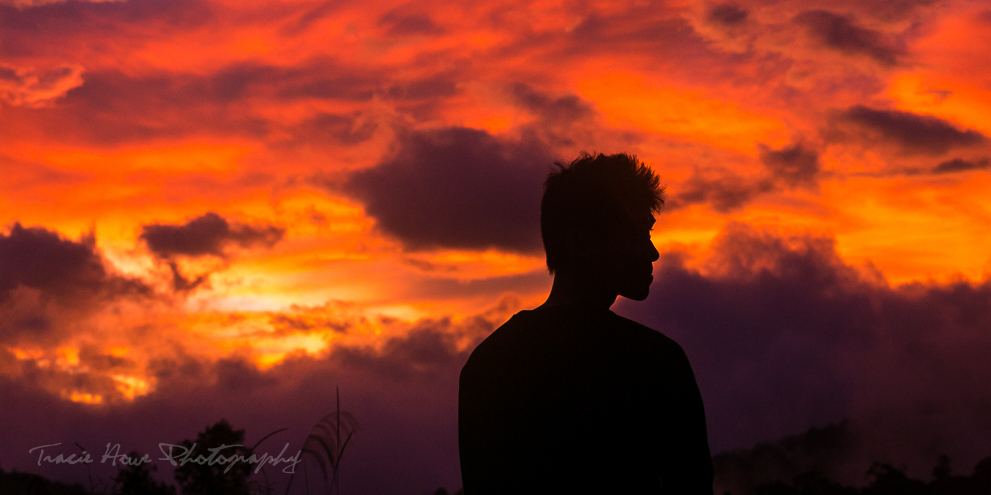
- Balance – A composition is often very successful if it has visual balance. Every element within a photo has its own visual weight and each one can be balanced by another. A large empty light space vs. a small dark shape. A pale blue vs. a bright red. A simple shape vs. a chaotic background. These can all balance each other out depending on relative size and position. It’s a really a tough concept to grasp (and to explain), so below are a few examples to demonstrate. Once you’ve put this into action a few times, you will start to get the hang of it.

The left photo demonstrates how much weight a dark shape can have. Even though there is less of the dark, it’s visually heavier than the lighter sky. As you can see on the right, cropping out some of the dark helps to create a more equal balance between the sky and the silhouette.
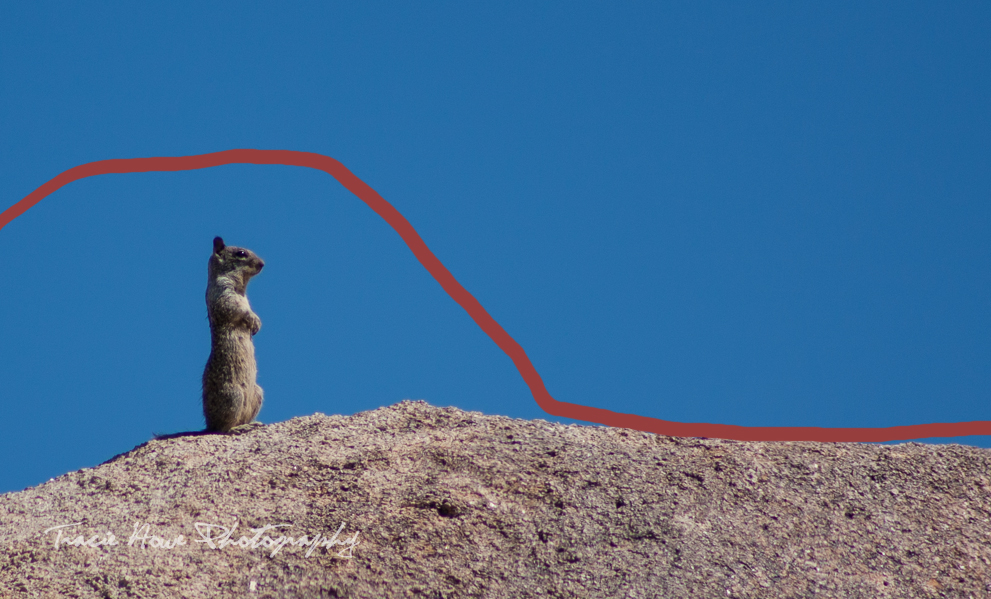
The tiny shape of the chipmunk carries a lot of weight around him because he is the subject of interest and stands out against the blue background. Try to visualize this extra weight by imagining a bubble of importance radiating around him. He’s also a similar color to the rock, so they almost feel like one massive shape, as indicated below the red line. Above the red line is an almost identical shape in reverse, indicating about how much weight the sky has. Together they create a balanced image.
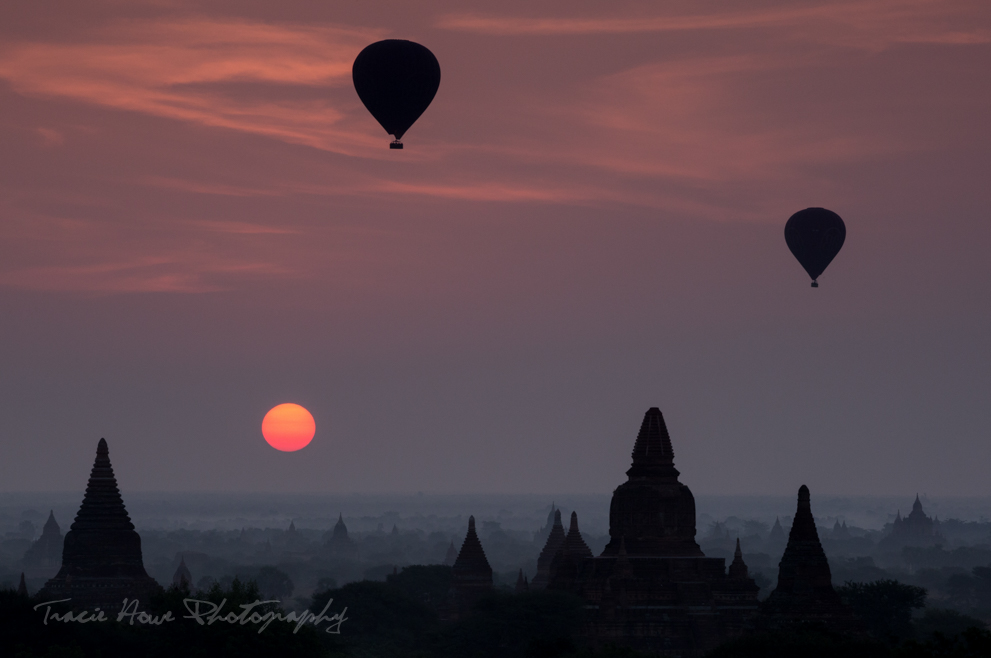
This photo works well because there is a lot of counterbalancing going on. The larger balloon closer to the left side adds its weight to the single temple on the left, while the already heavy right clump of temples is only burdened a little by the weight of the smaller balloon. Still, a lot of the heavy weight falls on the right side. However, a bright, colorful focal point like this blazing sun carries enough weight to even out the scales. And, just as in the first example, the bottom weight was lessened by including more of the sky.
- Symmetry – Nothing says balance like symmetry. Sometimes symmetry can be boring, so be critical of your subject before lining up that camera, and ask yourself if it’s interesting enough.
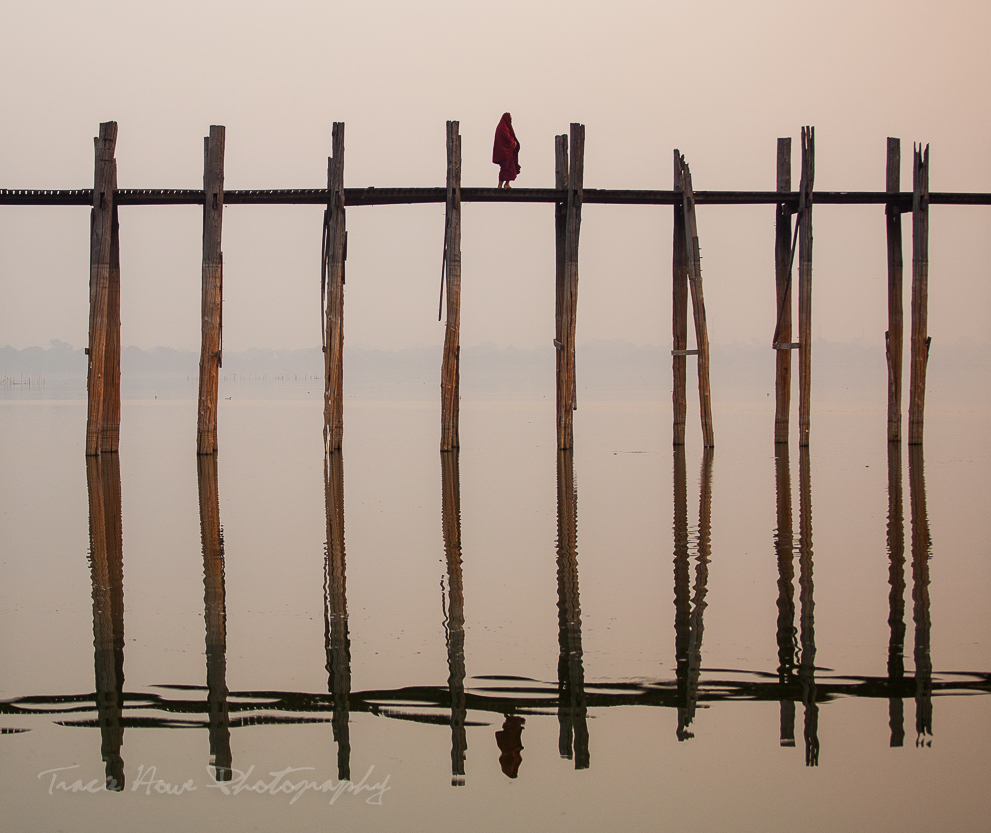
Reflections are great for emphasizing symmetry. It helps when a subject of interest walks into the middle and stops. ;)
- Direction – This principle applies to subjects that have the ability to move. If the subject IS moving, position the frame so that the closest edge is behind the subject, not in front of it if that can be helped. Like leading lines, the direction of a moving subject will lead your eyes beyond it, so point it into the photo rather than out of the photo. If your subject is stationary, the direction of gaze generally follows the same principle.
This is the same photo with a different crop… try to ignore the random guys in the background. Which one do you prefer? The right one feels right, doesn’t it? When I look at the left one, I keep wanting to use my Jedi powers to move the subject back away from the edge.
Practical advice
6. Keep an eye on little details – I have a pet peeve when it comes to having my photo taken. 9 times out of 10 my feet will be cut off or my eyes will be closed. And I rarely ask people to take photos of me! How does this happen so often? I have no idea! I’ve also seen plenty of photography where people are in distracting and weird positions, heads are cut off, and things in the background appear to be sticking out of someone’s body. Please just pay attention to little details like that and you’re on your way to better photos!

Remember this photo? Now you know why I cropped it. This little boy was in a weird and distracting position, so I cut him out of there.
7. Consider your focus – Know what your subject is and MAKE SURE(!) it is in focus. There is no easier way to distinguish a rookie from an experienced photographer than noticing that the subject is out of focus.
Quick Tip 1: Cameras tend to find sharp, contrasting things that catch the autofocus, but this may not be what you want if your subject is something else. If your autofocus is having trouble, find something with high contrast to focus on and then recompose. I’ll talk more about getting the right focus in later posts.
Quick Tip 2: Isolating your subject can also be important. When the background is distracting, blur it to literally focus only on your subject. You can also do the opposite and blur a distracting foreground if your subject is farther away. Some easy to use cameras will automatically be able to do this depending on the relative distance between you, your subject, and the background. I will explain more about this later, but meanwhile it’s something to start noticing in successful photos.
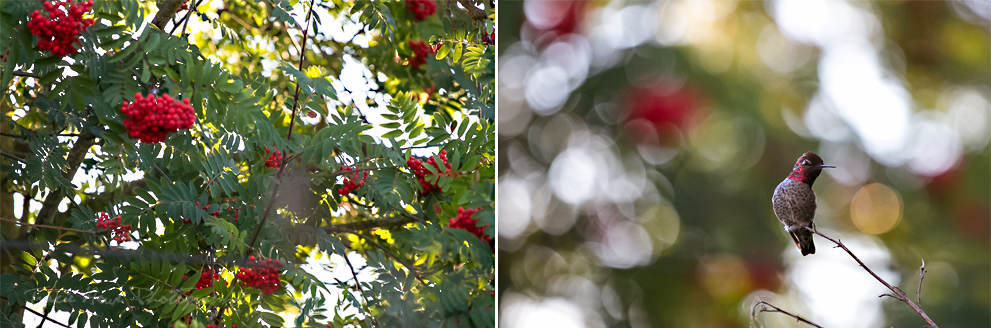
Here is a dramatic example of making sure your subject is in focus. These were both taken only seconds apart. In the first one you can see that my autofocus found the foliage rather than the hummingbird, which barely appears as a blur. In the second photo you can see that I have corrected my focus. This is also a great example of isolating your subject. If both the background and the subject were sharp, then this little guy would get lost in a very distracting mess of leaves.
8. Find something for the foreground – I rarely shoot a scene anymore without finding something interesting to photograph in the foreground. A lot of landscapes can be flat and boring if they only have one layer of interest, like in the first shot below. Adding something in the foreground makes for a more dynamic image, such as in the second example.
A pretty sunset, but I find it kind of boring. There is a lot of empty space up front.

I think this photo improves dramatically with a slight change of my position to include some foreground rocks. I would have liked more interesting rocks, but this is what I had. Do you see the angle of the second rock and how it points towards the sun? Notice where the sun is positioned? How about that horizon? Hopefully you’re catching on by now! ;)
9. Better selfies – For most people, low angles are not flattering, especially up close. Too many people unfortunately have not figured this out. The most flattering angle is usually from up high looking down.
Quick Tip 1: If you’re taking a selfie with your phone and you’re able to see yourself, then look at the lens. I know you’re pretty, but try not to look at yourself. ;)
Quick Tip 2: It gets more challenging when there is a pretty background that you also want to capture. Try moving yourself off center a little, unless you have a background below you like in this photo.

My friend, Marloes, has the right idea here!
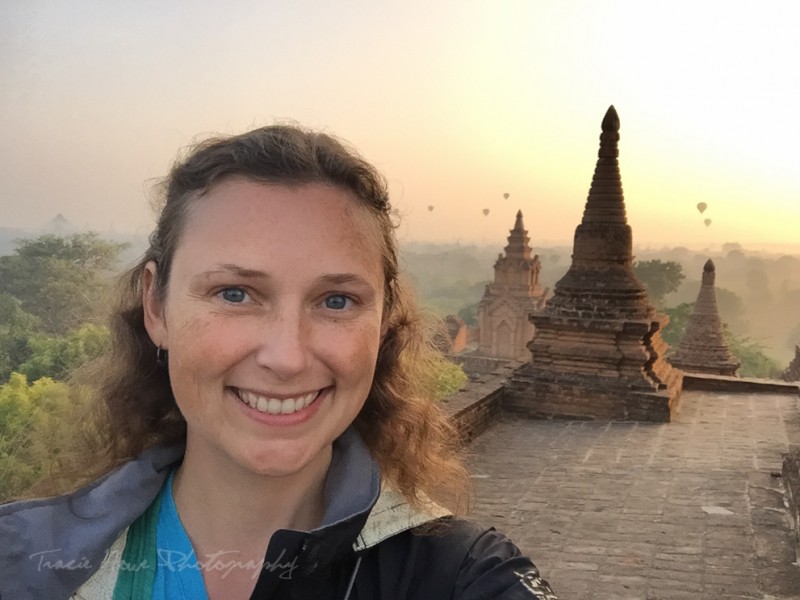
This is my latest selfie, taken at Bagan. I was pretty thrilled to be there! This was taken with a phone… selfies are really hard to do hand-holding a DSLR!
10. Think before you shoot – Don’t just “spray and pray”, because you’re going to hate yourself later when you have to go through all of those photos. Plus, you’ll never get better if you don’t have intent. Observe, consider your technique, anticipate, and then shoot. Along the same lines, don’t just shoot something because it’s there unless you have good reason to. Ask yourself why you are taking the photo. Is it visually interesting? Is the subject or action interesting enough? Can you capture the subject in a flattering way? Will anyone care to ask questions about this photo? Will you ever care to look at this photo again? A friend and I took a road trip together and I would tease him for wanting to take photos at every viewpoint, even if it wasn’t a very good one. However, he and I had different goals for our photos and that’s okay. I wanted to make awesome photography and he wanted to document the moment in that place. I’ll take “snapshots” when I just want to remember something too, but I’m always aware of taking too many photos just because.
Quick Tip 1: Don’t miss out on an opportunity because you’re only seeking perfection. You may not have a second chance, so go ahead and photograph something the first time you see it, just in case.

An embarrassing example of wanting to capture a moment even though it’s a terrible photo. This was the first time I saw land in Antarctica. I was pretty excited, but I was also worried that I might not have a better opportunity. I ended up taking lots of awful photos, just because I was there.

Though I was confined to observe Antarctica from my ship, I still managed to take away some beautiful photos of very memorable moments.
11. Have a look at the photo – Before you’re done, look at the photo to see if it’s okay! Most likely you have a digital camera with that ability, so use it to immediately realize your mistakes. Seeing a problem and then being able to fix it is a great way to practice problem solving. The hummingbird photo above is a perfect example of checking and then correcting.
12. Don’t be lazy – One of the biggest reasons for failure when trying to be a better photographer is laziness. You have to carry your camera often. You have to get out there even when you don’t want to. You have to stand up and move around to take a photo (unless you just so happen to be positioned precisely in the right spot already). You have to work for that shot! You also have to practice regularly and give yourself opportunities to overcome new challenges when they pop up. If you’re lazy, I can’t help you.

I saw this spectacular sunset from a porch, but two thirds of it was blocked by foliage and a roof that you can’t see here.
I was in my pajamas already, but I ran down to the road for a better perspective. There were still power lines and wet grass to maneuver around, but I did it! Fortunately my friend, Kevin here didn’t let laziness stop him either, so I was able to put him in the foreground.
13. Again, break the rules – Creativity is all about experimenting and breaking the rules. Just try to think of these more as guidelines. Using them often will strengthen your skills as a photographer, just don’t let them hold you back. Over time you will see what works and what doesn’t.
Ask questions
Hopefully I didn’t lose you anywhere! There is a lot of information here, but as you can see there is more to good photography than having a nice camera. If you have any questions, please don’t hesitate to leave a comment where I can answer it publicly so others can learn from the answer. Or if you’re shy, send me an email. :) And don’t forget to continue with the series. You can also subscribe to get updates delivered to your inbox!
Find each post from the series here:
Part 2 – Point and Shoot Cameras
Part 3 – Intro to DSLR Cameras
Part 5 – Desktop and Mobile Editing


Jessica - oh, wow! I just learned a lot. you described it in a way which beginners like me can easily catch up. Thanks for this! I love the concept of framing above all. ;)
traciehowe - Thanks Jessica! I’m glad I managed to explain it in such a way for a beginner to understand.:)
Gemma - This is extremely helpful, thank you for posting! I often find taking photographs of food very difficult, especially in dark rooms. An additional light be an option to try, thanks for the tip.
traciehowe - You’re welcome, Gemma! Yes, food can be challenging to shoot for sure! Depending on what kind of camera you’re using, a tripod (a mini one that can sit on the table) or an extra light would be very handy for food photos. I suggest putting the light off to the side, rather than straight on. That might help quite a bit :)
Karla | karlaroundtheworld - These are perfect tips for newbie photographers or those that just want good picttures when they travel but not into the technical details.
I would like to learn more about that mid day shoot though, shooting at that time is always harsh and I just dont know what to do.
traciehowe - Thanks for your comment, Karla. I’m happy that this helps. I’m not sure how much I’ll get into mid-day shooting in the upcoming series, but I’ll surely mention it again. Feel free to shoot me a message about specific issues you’re having and I’ll do my best to virtually help! A lot of factors are involved, so it really depends on each situation.
Cai Dominguez - Seriously, i bookmarked this article. Really helpful. Thanks for all the photography tips :)
traciehowe - Oh good! I’m glad you could find it helpful too, Cai!
Lauren - Wow, this is such an incredible thorough and amazing guide, especially for those who are starting to learn composition more with their photos…and those like me who could always use a refresher course! I’m going to share this around :)
traciehowe - Thanks Lauren! I’m so glad you found it useful. I really appreciate you sharing! I’ve already got some visitors because of that! :D
Trisha Velarmino - P.S. I'm On My Way - It has been difficult for me to find non-intimidating but comprehensive tips on photography because of the jargon but thanks for this insightful post for us non-techies, Tracie! I’ve had my fair share of difficulties in acquiring a nice range of shots as a solo traveller and a non-professional photographer. I just utilise the capacity of the non-professional gadgets that I have!
Extra thank you for the tips on selfie taking. It gets challenging for us solo travellers to squeeze ourselves and the view in one frame.
traciehowe - You’re so welcome! I really hope this helped you. There’s more non-techy tips to come! :)
Marta Cunha Grilo - Amazing tips, Tracie! I love to learn more about photography and I must say that these tips are really helpful. It’s the first I’m “hearing” the expression “raccoon eyes” haha. Never really knew how to call those kinds of eyes and now I do!
traciehowe - Great! I’m glad this could help, Marta!
Calum Lewis - Some great tips here!
traciehowe - Hey Calum! Thanks for the comment!
Robert Chance - Thank you for such an informative article. As a beginner on a learning curve I found it pitched perfectly with great examples.
traciehowe - Thanks for your comment, Robert! I’m so happy to hear that this post helped you out. I hope you continue the series! :)
Abby - These are great tips for amateur photographers! Thank you for sharing!
traciehowe - Thank you, Abby! I’m glad you enjoyed them!
iza - Very good , i’m a italian amateur photographer and you help me a lot ! Thank you so much !
traciehowe - That’s great, Iza! I’m glad to hear it. Thank you!
Rojar - Hi Traciehowe…..This is excellent photography. Thanks a lot for sharing !
traciehowe - Of course! Thank you for commenting!
event photography Melbourne - When I capture something, there are times that I capture an epic photo. I don’t know why but there is something in taking photos.
Leandro Lima - Light can be a big problem for us who love photography. Sometimes it gets in the way and it’s difficult to find the right position and light. So it is worth risking and taking from various angles. great tips.
traciehowe - Thanks for your comment, Leandro! It’s all about the light!
Richard Huey - Thank you for sharing all all those tricks and tips. This is great information for someone starting out and a little refresher from me as well. Thank you for sharing
traciehowe - You’re welcome! Glad to help!