
We are almost done with this series dedicated to non-technical photo tips!
If you are a true beginner, I suggest reading through the entire series before tackling this post. Particularly the non-technical tips for ANY camera, which was the series introduction. The series should arm you with the knowledge you need, not only to take better photos, but to decide what kind of camera you want to use for the kind of photography you want to do.
I first targeted this series towards travelers because there’s definitely a different mindset when one has to lug camera gear around the world, but I realized that all the information in the series should be useful for any beginning photographer.
DSLR cameras – settings
Here we continue with the second post on DSLR cameras which deals with settings. If you have already read the posts leading up to these on DSLRs or you already have a basic understanding of photography, you might still find my intro to DSLR cameras useful. Since this post covers DSLRs and taking control of them, I suggest that you have your camera’s manual book near by to refer to. While I can explain how your settings should change for different situations, I can’t tell you where those settings are and how to change them, because all cameras are different. If you don’t have your manual, you should easily be able to look it up online.
To take complete control of your camera, there are three main settings that you will need to learn about and how to set: Aperture, Shutter Speed, and ISO.
If you don’t know Aperture, Shutter Speed, and ISO, you will never fully understand how photography works, how to take complete control of your camera, or how to take your skills to the next level. This is important stuff, so switch your camera to manual now and follow along. :)
If you don't know Aperture, Shutter Speed, and ISO, you will never fully understand how photography works, how to take complete control of your camera, or how to take your skills to the next level. Click To Tweet
The Exposure Triangle
There are a lot of things that need to happen to make a great photo. First, there is obtaining a proper exposure, which basically means that the photo has a good balance of lights and darks, where the highlights aren’t too bright and the shadows aren’t too dark. There are aesthetic choices to be made as well, like I discussed in the series introduction post. Aesthetics and exposure aside, you’ve still got to nail the technical aspects that make up a good photo such as avoiding camera shake (an unintentionally blurred image), too much noise (ugly graininess), and a poorly chosen depth of field (area of focus).
The image below is the Exposure Triangle. This is a quick reference for how Aperture, Shutter Speed, and ISO work together to achieve a technically good photo. A good exposure is a balance of these three settings. How you set each one will give you different results in addition to a proper exposure. Shutter speed will impact motion blur, aperture will affect depth of field, and ISO will determine how much noise an image has. Don’t get too caught up in trying to understand this graphic until you’ve read through the post. You can always come back to examine it. Below I will explain each of these three settings more in depth so that you can apply this knowledge to each photo that you capture.
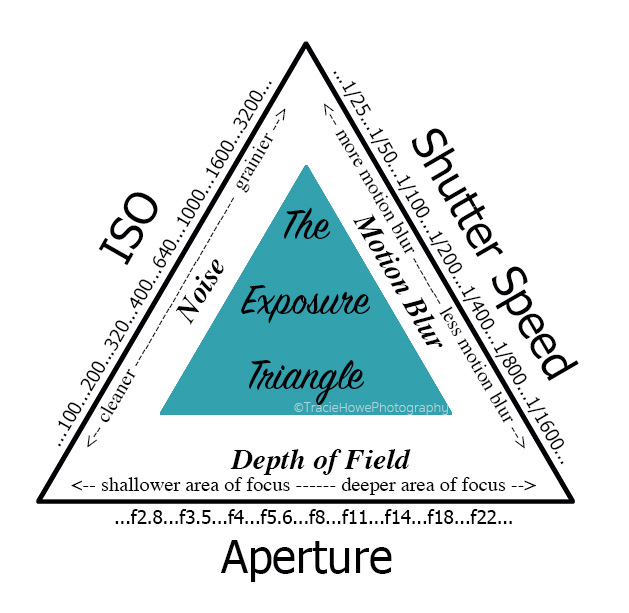
In time I may add photos to help explain this a little better.
Aperture
Aperture (or the f-stop) refers to the size of the opening of the shutter. Remember, the shutter lets in light, so it opens and closes back up. I like to compare Aperture to how pupils adjust to light. When you walk into a dark room your pupils grow larger so that you can see “more”. Opening the aperture wider allows in more light, while closing it down smaller will decrease the amount of light. Adjust your aperture to be wider to get a brighter photo. Sometimes the aperture will be denoted by f (for f-stop) preceding the number.
Fun and not so fun facts about aperture
- Here’s the worst and most confusing news first… setting a wide aperture/larger opening actually means setting a smaller number! Don’t ask me why that’s true, but it’s the opposite of what makes sense to us non-technical people. So, if I use my 35mm f1.4 lens as an example, the widest aperture is f1.4. If I want the aperture to be very small, I might set it to f16. Weird, huh? But important to remember!
- Every lens will have it’s own range of apertures which will affect how high and how low you can set the Aperture on your camera. My 35mm lens has a range of f1.4 to f16. Yours might go from f4-f22. It just depends. Most lenses should say the lowest number on the front of the lens at the edge of the glass. The lower the number, the “faster” the lens, because using a wide open aperture will allow you to set your shutter speed faster.
- To make matters more confusing, cheaper lenses will force the lowest number to change depending on how zoomed in or out you are! For example, your lens might say 3.5-5.6 on the front. If it does, then your lens has a variable aperture. Zooming in will cause the aperture to gradually be forced to a higher number. This is important to know when you are purchasing lenses, because sometimes you really want your settings to stay where you put them!
- The best thing about controlling the aperture is depth of field, which is the range of focus. Depth of field is actually bit more complicated than that, but I’m trying to simplify this for us non-techies and this is what you need to know about it. Sometimes you may want to have an entire landscape sharp and in focus, while for a portrait you may want to isolate your subject by decreasing focus in the background. The depth of field can vary based on a number of factors including the focal length of your lens, what your aperture is set to, and distance between your camera, your subject, and the background. This can be a complex set of variables, but you will learn more as you practice. For now, suffice it to say that the smaller number aperture (remember, that’s a wider opening), the less depth of field you will have. In other words, if you focus on a face and want to blur out the background, go for a smaller aperture number. This will have a greater impact if you are relatively close to your subject, or if you have a telephoto lens. If you want a landscape to be sharp throughout the image, try a larger number (smaller opening).
- Something fun to try with the aperture is creating star shapes in photos of lights. It’s easiest to do when there is a lot of contrast between the background and the light itself, so you can actually see the effect. All you have to do is photograph a street light or even the sun if the sky is dark enough. Try it, it’s a fun experiment!

I wanted my focus to only be on these front tulips, so I set my aperture wide (smaller number) to make it happen. Of course, I also had to get my lens to focus on the front flowers. If I had it focus on the background, then the foreground would be a blur.
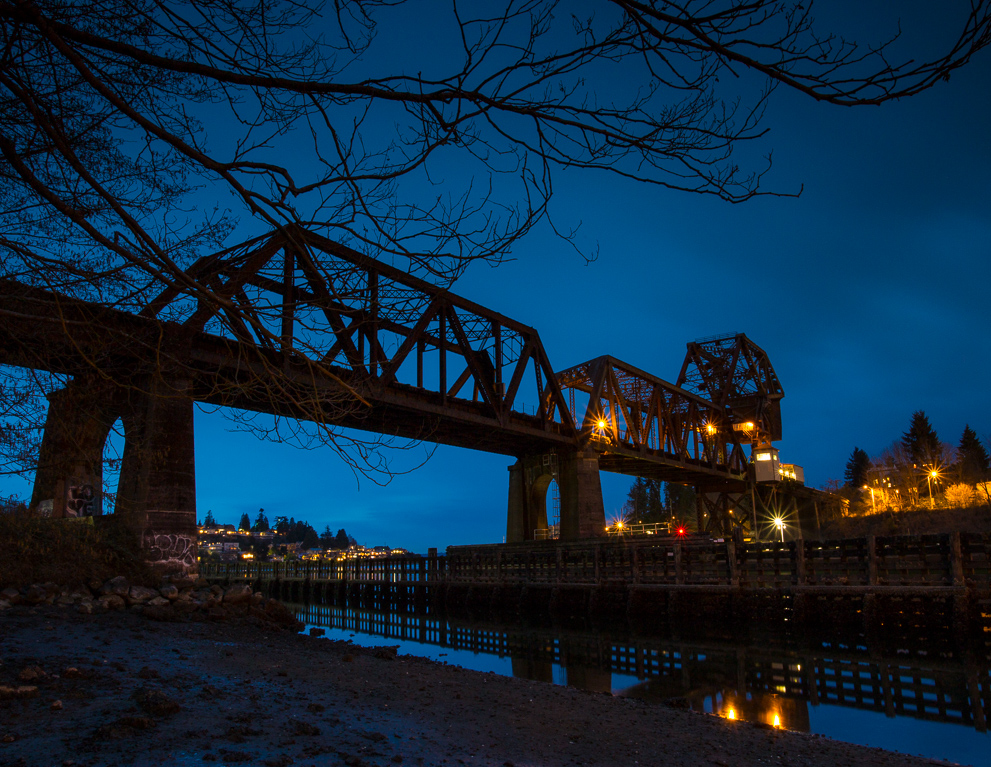
Here you can see that a small aperture (remember, that’s a high number) gives me a star effect in the lights. I wanted to capture a full range of focus here too, so it’s a win-win setting!
Shutter Speed
Shutter Speed (or simply “speed”) is how fast the shutter opens and closes. Think of the shutter as opening and closing a door. If you open and close a door from a bright room to a dark room quickly, you will illuminate the dark room and get a pretty good idea of what it looks like. If you open it for longer, you can take in more of the scene inside the dark room before the door closes. Hopefully I didn’t lose you with that analogy! I’ll explain more below, but just remember this for now – The slower you set your shutter speed, the brighter the image will become, and vice versa. Faster speeds will be some fraction of a second, but on some cameras they may appear as a single number (not a fraction). Slower speeds will be full seconds, sometimes denoted with a ” before the number.
Slow it down or speed it up?
Bright, sunny days will provide plenty of light to push through your shutter, even if the Aperture is narrow and the shutter is only open for a split second. Dark interiors, for example, may not provide as much light, so you have to leave the shutter open for longer so the sensor has more time to record that light. That’s as simple as I can explain it.
The problem with leaving the shutter open for longer is that the image will be blurred if the speed is too slow and you’re holding the camera in your hands. On a smallish lens (not a big long one), 1/30 of a second or less is starting to get into slow territory. At least for me, and I have steady hands. If you want to play it safer, try 1/60 as your slowest shutter speed. On longer lenses, you will need to shoot at even faster speeds because they’re more wobbly. The general rule is that you should match the longest length of your lens to come up with the slowest hand held speed, or double that number to be even safer. For example with my 70-200mm lens, I should not shoot any slower than 1/200th of a second. If I’m trying to be very safe about it, I should shoot at 1/400 at the lowest, but as I said I’m pretty steady.
Shooting fast enough while hand holding your camera prevents camera shake, but it may not solve motion blur. Motion blur happens when your subject is moving too fast for your set speed. If you’re shooting a flying bird, 1/60th of a second won’t cut it! For birds, I try to shoot at least in the 1/thousands because they’re so fast.
To get a perfectly sharp image, if you’re not shooting at a fast shutter speed, then your subject needs to be still and so do you. This ensures that the image doesn’t blur in any way. The best way to do this is to use a tripod… but this of course only works if your subject is not moving.
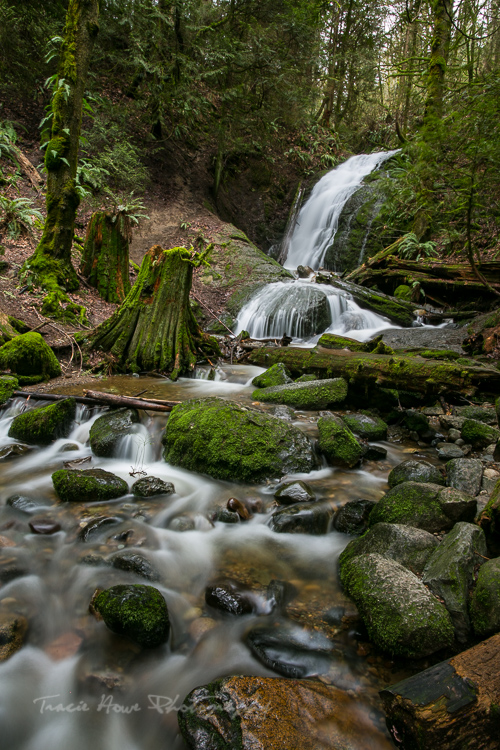
There are however creative uses of a slow shutter speed. You can add light (such as with a flash or reflected light) which freezes the action of what it reaches. You can pan your camera to follow something in motion, which is a way to slightly blur the background as you track your subject moving. A little tricky, but possible! You can also blur something moving while the background stays sharp, such as a waterfall.
To get a perfectly sharp image, if you're not shooting at a fast shutter speed, then your subject needs to be still and so do you. This ensures that the image doesn't blur in any way. The best way to do this is to use a tripod... but… Click To Tweet
Aperture and Shutter Speed working together
When you’re learning photography, it can be challenging to understand how shutter speed and aperture work together. You have to decide what you’re going for in any given scenario. Sometimes you will want your entire image from foreground to background to be sharp, so you will set a narrow aperture (high number like f16) to get the depth of field that you want. This means aperture is your main priority, so you will then have to adjust your shutter speed to match that for the given amount of light in the scene. Other times you might want to set a fast shutter speed to freeze a flying bird, so you will need to adjust your aperture to make that speed possible. They need to work together based on your intention for that photo.
ISO
ISO is the digital version of ASA from film days. ISO is basically the sensitivity of the sensor to light. A lower ISO like 100, is the least sensitive to light, while a higher number of 1800 is more sensitive to light. This means that the higher you set the ISO number, the brighter the image will become.
Be careful with that ISO
While this is one of THE three settings to adjust in manual, you need to be careful with this one. Look at it as the last resort after shutter speed and aperture are where you want them. Even when you have your aperture as wide open as it can go, and your shutter speed as slow as it can go, you just can’t take a photo without the help of a high ISO. This will be in darker environments, such as a dark room where you’re trying to capture the motion of kids running around.
Keep it low until you need to make it higher. The higher the number, the grainier the image will be. Some cameras will handle high ISOs better than others though, so you may have more of a range if you’ve got a good camera. You may not want to push your ISO as high as your camera will let you, so check to see what is an acceptable high ISO for your camera by taking test shots and viewing the results on a computer. I try to keep mine around 100 and push it up gradually if I need more light. With practice you will begin to understand how far you can push it up and when you need to do it.
Sometimes it’s just too dark for photos. Even with your highest ISO, your slowest shutter speed, and your widest open aperture, you may simply not have enough light for the given situation. This is when you have to learn to sit back and enjoy the moment without your camera or learn some advanced lighting skills. ;)
Metering
If you’re still not sure what the heck this means for how to take a picture, I don’t blame you! It’s not a simple thing to learn… or explain. You have to apply all the things I’ve covered in this post to choose the correct settings. The good news is that I’m going to share a quick way to cheat when trying to get the right exposure.
It’s called using your camera’s internal light meter. This is a tool built into your camera that helps it guess how much light you will record for that perfect exposure. There is a scale from the left (underexposed) to the right (overexposed), and the middle is generally where the best exposure will be. The meter will move around the scale depending on your settings and where you’re aiming the camera. If your settings are correct for a photo of a dark carpet (maybe that’s your thing, I’m not judging) and then you point it towards a bright window, your meter will jump way to the right. It’s trying to tell you that your image will be overexposed if you keep those settings and take a picture of that window.
You can find this inside your viewfinder, on the top of your camera, or on the LCD screen. You can make it appear by pushing the shutter button half way down.
Don’t use the meter as a hard and fast solution though, because it’s only the camera’s best guess for the kind of photo you want. In the window example, the meter being over to the right suggests that you should darken the scene a bit. If you change your settings until the meter is in the middle, that may be a decent exposure for what’s outside, but what if you want a silhouette of something outside the window? You will have to darken the exposure way down, putting the meter far to the left to get the silhouette. Another example is if you want to brighten a scene to show something in the shadows, such as something inside near the window. In this case you will have to push it way over to the right.
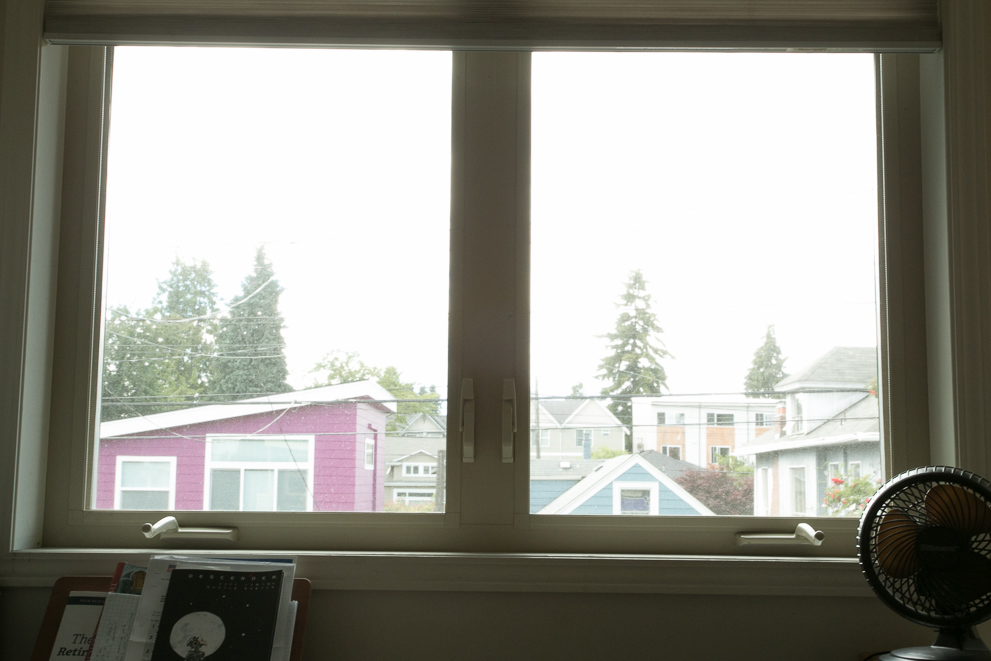
You can scroll around your dials haphazardly until you get what the meter says is a good exposure, but you risk losing whatever creative decision you may have decided on. For example, if you want to photograph a landscape and move around your settings until the meter is in the middle, it may be that you’ve landed on a very wide aperture which will give you a short area of focus. None of the rest of the photo beyond a few feet will be very much in focus. This is why it’s important to really understand your settings and think through them. In the window examples below, I wanted everything to be sharp from the fan inside to the house in the distance, so I kept my aperture small (high number). *These photos were straight out of the camera, only edited by cropping (not to mention taken from my desk for the purpose of this post! ;D).
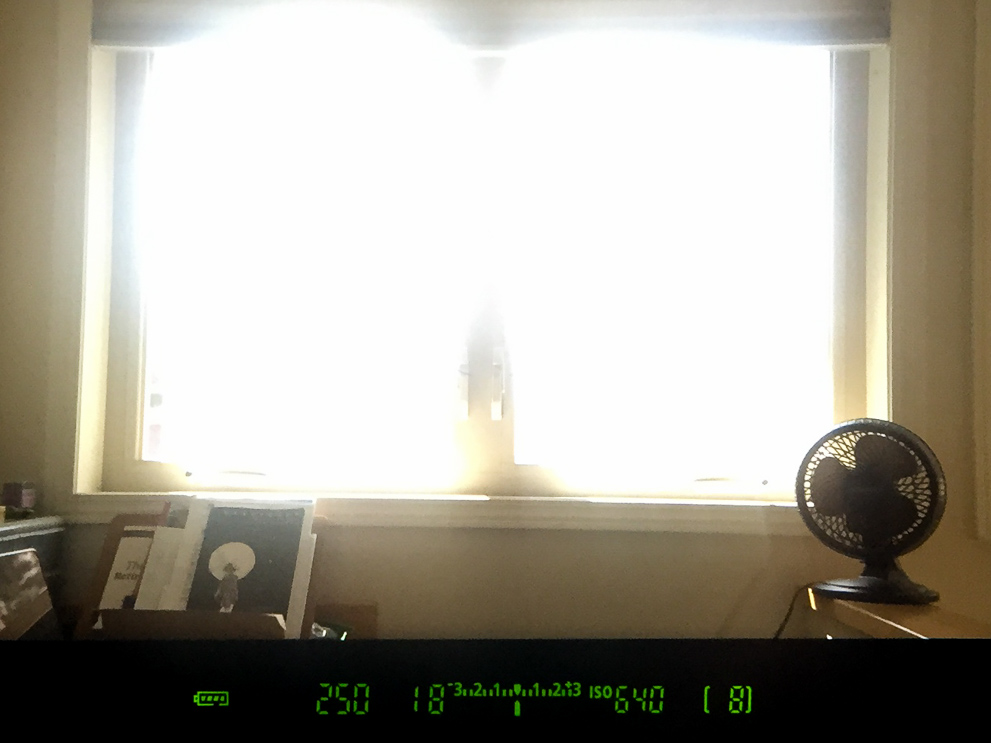
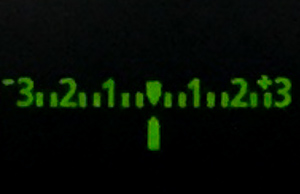
*Please ignore the brightness of this image, it has nothing to do with the resulting photo… I managed to take a shot of the meter through the viewfinder with my phone! Anyway, this is what the light meter looked like for the next photo. As you can see, the camera thinks the exposure is correct.
This is the resulting photo from the settings used above. Pretty close to a perfect exposure, unless of course you’re trying to capture the inside of the room.
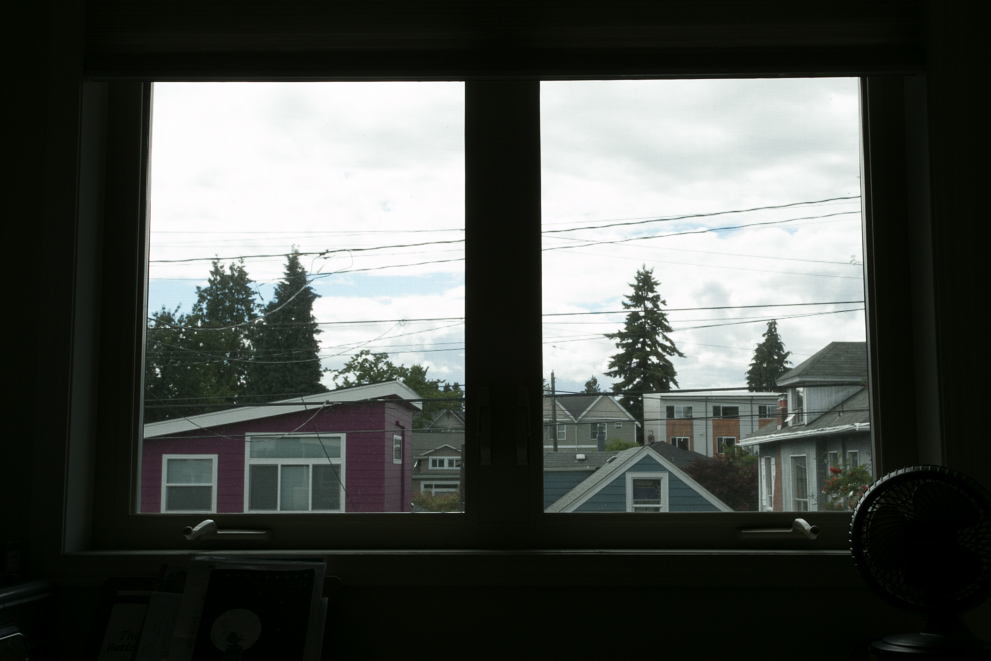
I had to push the exposure way up to capture any details in the room. The light meter was pushed all the way off the scale on the right side as I adjusted both my shutter speed (1/30) and my ISO (1600). I kept my aperture at f18 so that everything from the window on was sharp. Unfortunately with this technique, you can lose details in the brightest areas. In cases like this, you must decide what your priority is – the inside or the outside? Of course, this is an extreme example to demonstrate my point, but you often do have to make tough choices in photography. That, or add light to the interior, but this is a skill that takes some expertise to do it well.
Slow down and follow a process
When you’re setting up for a photo, it helps to carefully walk yourself through a mental process. First, ask yourself what your goal is for the photo. Then determine what the most important factor is in achieving that goal? If setting your aperture a certain way is your priority (based on what you’ve learned in this post), then set that first, followed by your shutter speed to make the chosen aperture possible for your best exposure. If setting your shutter speed is your priority, then set your aperture after your shutter. Next you can move on to ISO if you’re not getting the correct exposure with the previous adjustments. The best thing about learning digital photography is that you can immediately see what your results are, and then you can correct them if they aren’t working. Remember the Exposure Triangle – everything has to work together.
The hardest part is probably trying to remember what settings do what. It takes practice to commit this stuff to memory, and once you’ve practiced under different circumstances, it will become more and more second nature to you. I promise! But it doesn’t happen over night. You’ll get there if you keep at it!
I hope this has helped! It’s not a simple thing to learn by any means. If you’ve gotten this far in the series and are still dedicated to learning and improving, then I have no doubt that you will succeed. And please, if you have any questions, ask away in the comments!
Happy shooting and don’t forget to continue with the series. You can also subscribe to get updates delivered to your inbox!
Find each post from the series below:
Introduction – Non-technical Tips for Any Camera
Part 2 – Point and Shoot Cameras
Part 3 – Intro to DSLR Cameras
Part 5 – Desktop and Mobile Editing


Chris - Those technical tips are a little beyond my realm, but I love stopping by just for your gorgeous photos! :-)
traciehowe - Thanks for stopping by, even if only for the photos, Chris! I really appreciate it! :)
Dannielle - Thank you so much for breaking it down in a way us non technical people can understand! I have an Olympus Pen and I’ve been to nervous to try it on manual settings, but this makes it SLIGHTLY less confusing. Going to bookmark this and use it as a guide when I have time to play around!
traciehowe - Hi Dannielle, you’re so welcome! I hope that when you’re ready to play around with your own camera that it makes even more sense. There’s a lot to be said about hands on learning, right? Thanks for your comment! :)
Thuymi @ www.AdventureFaktory.com - Great tips for new photographers :)
Not too heavy just perfect straight to the point information!
traciehowe - Thanks Thuymi! I hope it’s not too hard to understand!
Maria - This was a great review for me! I am familiar with those concepts, but you put it into an easy to understand language.
traciehowe - Oh, that’s good to hear Maria! Thanks for your feedback!
Lisa (Klipdrifters) - Lots of technical and usefull info here. Been learning slowly about the various settings. This is a big help. Thank you!
traciehowe - You’re welcome, Lisa! Hopefully it’s not too technical!!
Mar Pages - Your photos are always beautiful, and I think its great that you’re sharing your tips with everyone else! I especially love how aperture changes a photo, those tulips look amazing.
traciehowe - Thank you Mar! Yes, I figured I should start spreading the knowledge since people kept asking! ;)
chandi - Hi, I appreciate how much time and effort you clearly took to write this post. I hope I can learn more my DSLR camera from this (I only know the basics and have a lot to learn.) For me, for the way I learn best, I would like to physically be with you or whoever is teaching me… you know, experiential learning, where I am manipulating the shutter speed, etc in the moment with someone showing me…Too bad you don’t live in my town!
traciehowe - You’re welcome Chandi! I completely understand. I learn best in the same way. If you can’t sit down with someone, I really suggest looking up how to set your shutter speed, aperture, and ISO in your camera’s manual. Then taking some of the examples you see in this post and trying those settings. Then keep practicing! Best of luck!
Mary - A Mary Road - Great tips you have here! Even for beginners and first timer who owns a DSLR can get good advice from your article! :-)
traciehowe - Oh good! Thanks Mary, I’m glad you found it helpful!
Vyjay - These are some really useful tips. I liked the one about ISO, I too have been having issues with the quality of my pictures and will definitely try your advice on this.
traciehowe - Great, Vyjay! I hope that helps!
Evan Kristine - Great tips, Tracie! I would try some of them on the given chance. Thank you.
traciehowe - You’re welcome, Evan. Thanks for the comment!
DigitalCameraHQstore.com - Great post..! thanks for sharing really helpful to develop my skills on DSLR’s The pictures are stunning.
traciehowe - You’re welcome! Glad to help! :)
Stephen Alex - Thanks for the informative post. This post helped me to learn some new things about the technical photo tips. Keep posting. Please let me know for the upcoming posts.
Torie Battle - I love this article! Thanks for all the information 🙂 What camera would you recommend me for 3-4 hour podcasting and film making?
traciehowe - Hi Torie, I’m afraid I don’t keep up with the latest gear out there. I also know next to nothing about film making or podcasting. Sorry, photography only here. Best of luck!
Tracie