
This is my final post in the series of non-technical photo tips for travelers (or really anyone else, mobile or otherwise).
I’m happy to see how much people have gotten out of these posts! It all started with the series introduction here, which is really a foundational post for photography with any kind of camera, so I hope you’ve taken some time to look it over. It may very well help you in understanding this post more, as may the other posts in the series.
To wrap this evolving series up, here I end with the topic of editing (also known as post-processing). I’ve seen so many terrible photos that clearly were the victims of poor editing, and that was actually one of the main reasons I started this series. In this post I describe some editing tools, suggest how and how not to approach editing, and explain how the end goal of the photo can affect the way you edit.
*The advice given here is based on my own editing style.

Editing tools
There are a wide range of editing tools available to anyone with any kind of digital camera. There are free tools, pricey tools, and everything in between. Because there are so many, I want to focus on just a few here. Please feel free to add some of your suggestions in the comments!
Desktop Programs
• Photoshop – Okay, everyone knows about Photoshop, but it’s got a bad rap. While Photoshop has a reputation for retouching photos beyond reality, that is not all it can do. Yes, it can be used to make someone appear skinnier than they truly are and things can be added to and taken away from photos, but it’s also a great general editing tool. Non-photographers so often make the terrible joke that “you can just Photoshop that”, which in context always implies some magical retouching of ridiculous proportions. But the funny thing is that any photo can be “Photoshopped” without being an unreal representation of the subject. In other words, it’s not funny… stop making that joke!
As I said, Photoshop is great for retouching and editing, but it’s not the only option for editing your photos. It’s amazing for professional photographers, especially if the workflow involves editing only a few photos at a time. However, I recommend Lightroom for a larger quantity of photos. Both Photoshop and Lightroom alone have hefty price tags if you buy them outright. Or did… I’m not sure if that’s even an option anymore. The good news is that you can purchase the Adobe Creative Cloud subscription which includes both Photoshop and Lightroom (plus more) for $9.99/month. You can purchase through the link below as a way to support Tracie Travels!
• Lightroom – Lightroom is my favorite editing tool! It’s extremely complex, but it takes care of almost everything you could want while handling a ton of files all at once. You can work with RAW files and never have to save the new versions (RAW or not), because the edits themselves are saved and not permanent. Edits can be synced to other photos, which means you only need to work hard on one and apply the settings to the rest that have similar characteristics.
You can also buy pre-designed edits, called Presets, and apply those to your photos to save you a lot of guess work. This is a fun way to quickly edit your photos, while tweaking adjustments to suit your needs. It’s a great way to learn how best to use Lightroom as well! One of the Presets that I’ve been enjoying recently for my landscapes is Sleekens – Through the Woods Workflow. This one seems to give me a lot of great options that I can either use straight “out of the box” or tune to the look that I am going for. It matches pretty closely with my style of editing, so I’ve been pretty happy with it!
While I LOVE Lightroom, I would not recommend it to beginners unless you are determined to become more serious about photography. Lightroom has a big learning curve and can take quite a while to master… especially for us less technically savvy folks. Lightroom also doesn’t handle retouching nearly as well as Photoshop, so there will be no head swapping in Lightroom. If you do end up going with Lightroom, the best deal out there is the $9.99/month Adobe Creative Cloud subscription that I mentioned earlier, which includes Photoshop.
• Photoshop Elements – Photoshop Elements is Photoshop’s little, cheaper brother. I don’t know much about it aside from it being more affordable and less complex. It should take care of the most common editing needs though, so it’s a safe bet for anyone not willing to plunge into the professional world of editing.
• Various built in computer editing programs – I’m not bragging here, but I only use the pro programs. I really can’t tell you much about anything else except that most computers will likely come with some very basic editing program. Even Apple’s Preview has some editing tools built in. Most programs should be able to do things like crop, rotate, and make simple color edits. That’s about all I know. I’m happy to include anyone’s suggestions for other programs in the comments.
Mobile Apps
It seems as if many of our favorite Desktop tools are also available in app form. Some may only be available for iPads while others are meant for phones. If you like a particular editing program and don’t want to learn something new, try looking for it as an app. For example, I know that Photoshop and Lightroom have some out there. With that said, I have some of my suggested editing apps below for those of you who are often editing from the road.
• Snapseed – I think this is the best app out there for mobile editing! It’s got a decent range of capabilities, but it is only an app after all. I like to use Saturation, Contrast, and Structure when I’m posting to Instagram. Ambiance is something I almost always use and I’m still not quite sure exactly what it does, but tiny square photos come to life when I use it. Just be careful not to overdo it! Snapseed can also do selective edits like healing small spots and brushing on effects. Not too shabby for a phone app!
*I just found out that Snapseed also has a desktop app available for Chrome users and is integrated with Google+.
• VSCO – You’ve probably heard of VSCO. It’s claim to fame is thanks to its film-like filters. Some are pretty nice and can really give your photos an interesting look. VCSO also has some fairly advanced features like a highlight reduction tool and temperature controls, which make it worth adding to your mobile editing arsenal.
• Instagram – As you probably already know, Instagram has a set of filters that you can apply to your photos for that Instagrammy look. It also has basic editing tools built in.
Tip 1: Upload your computer edited photos to Dropbox and then download those onto your phone. If they are intended for your phone or an app like Instagram, editing them a little further on the phone is a good idea because they are much smaller and will need a little more of a boost to stand out.
Tip 2: Alternatively, try a wi-fi card (some cameras have wi-fi built in) to send camera photos directly to your phone for editing.
Screen Calibration
Before I get into how to edit your photos, there’s something you should check on if you’re working on a desktop… something I forgot about until I started revising this post on Dave’s laptop. You’ll need to make sure your monitor is properly calibrated. Have you ever noticed that your photos look perfect on your own computer, but greenish and dark on another screen? That’s because not all monitors are created equal. You can buy a fancy tool, like the Spyder series of products, or you may be able to calibrate within your computer’s display options. If you’re making professional prints that need to match your screen, then the tools you can purchase might be worth the cost. If your work stays online, you may be okay with a built in calibration. I can’t speak for other computers, but for Macs you can simply follow the instructions within your System Preferences under Displays. I recommend tweaking your monitor before you do any edits!
Laptops are challenging to edit on because they change a little depending on the angle of the screen. It’s best to try and position the screen consistently every time. When you’re always working in different spaces, you also need to be careful about the light hitting the screen. It’s always best to edit in a darker space. I find that even with my desktop computer, I can’t edit photos in the afternoon because of the light coming in through my window.
If you’re working from a phone, you probably can’t do much about your screen. You can however adjust the brightness of your screen. I like to leave mine somewhere in the middle, just to be safe. I would hate to overcompensate for a really bright screen so much that it appears too dark somewhere else. I don’t know how it works but the middle seems like a safe bet!
How to edit your photos
The number of ways to edit photos is seemingly endless, as are the number of styles one can choose to edit. In this section I will provide you with the edits that I apply to my photos. Though every photo will require a different set of edits, these are the ones I most often use. Keep in mind that if you have the option to shoot in RAW as opposed to JPEG, you will have the most flexibility when editing.
• Cropping – First, (if necessary) I crop. If you can’t get a perfectly straight horizon or you don’t have time to properly compose a photo before taking it, do it afterwards. You can crop for a better composition or to cut out excess junk that doesn’t need to be in the photo. I don’t recommend cropping in too far to the image though, as this will diminish the quality. You are essentially cutting out all that resolution that you paid good money to have, so cropping is not something to take lightly.
You can of course see how dramatically a photo can improve by temporarily experimenting with the way it is cropped, keeping the rules of composition in mind of course. If you happen to be using Lightroom to view and edit photos, there is a cool tool that allows you to preview how you might improve your crop. Just go to the crop tool and hit “O” on a Mac or “Shift+O” on a PC to rotate through different ways to improve your composition and then crop accordingly. These include the rule of thirds and some other principles discussed in my intro post. :)
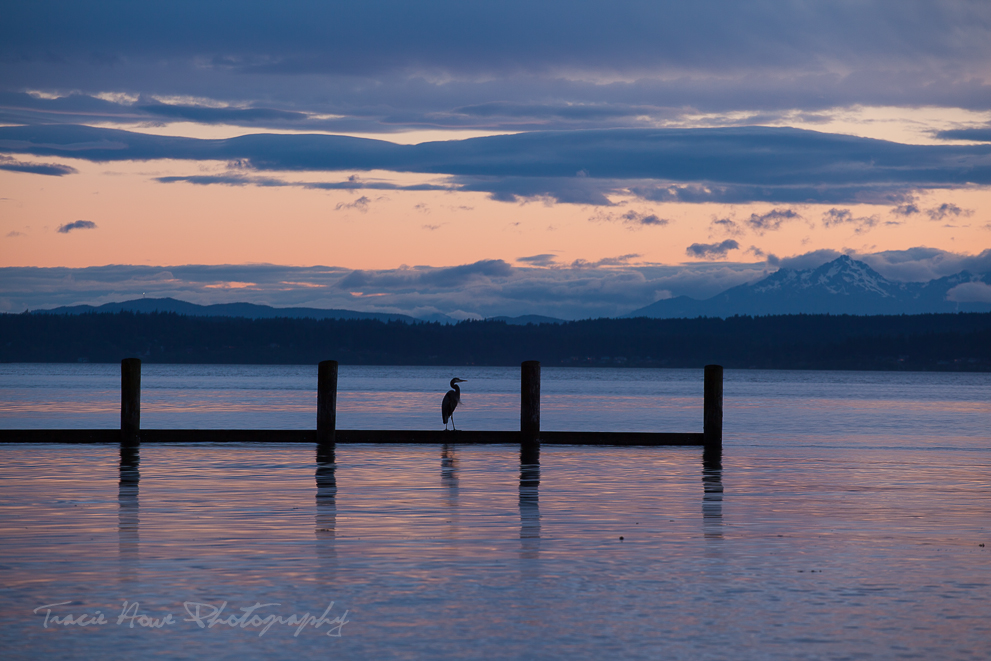
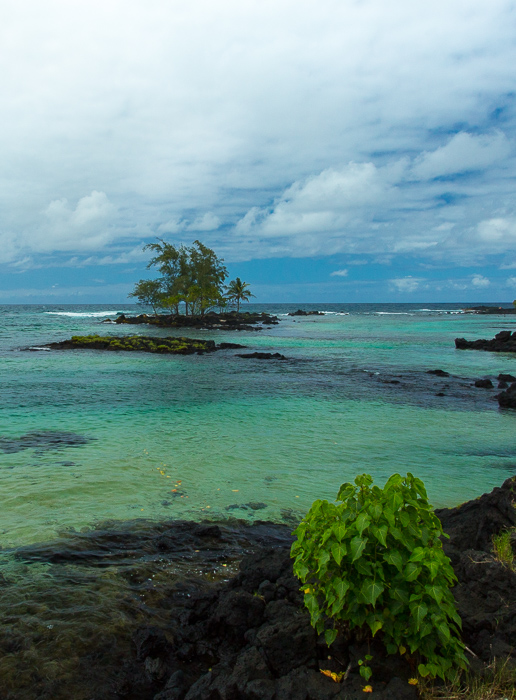
This photo can improve with a slight crop adjustment.
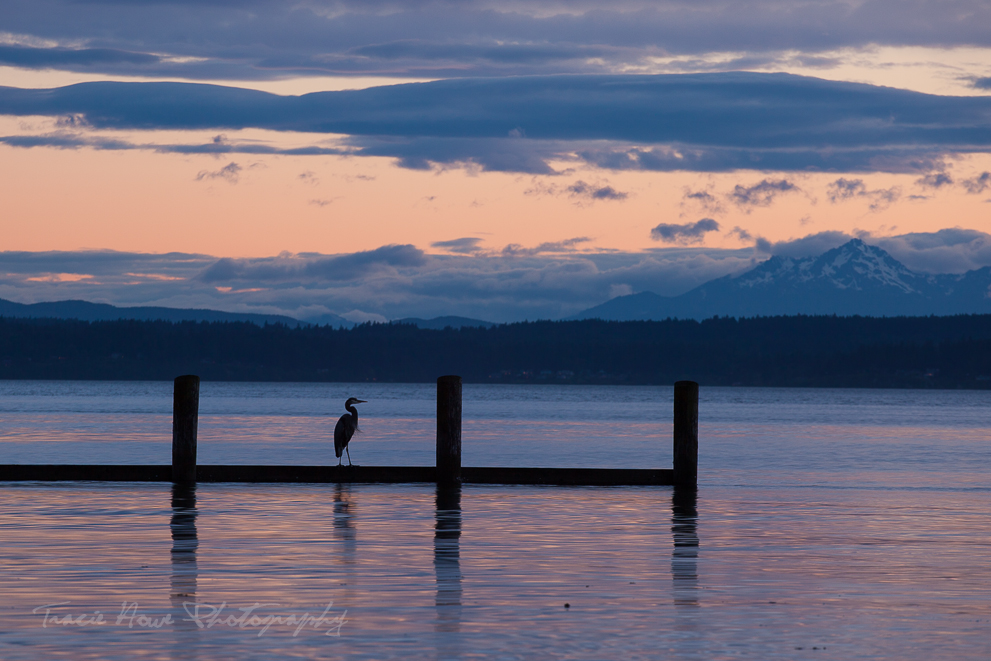
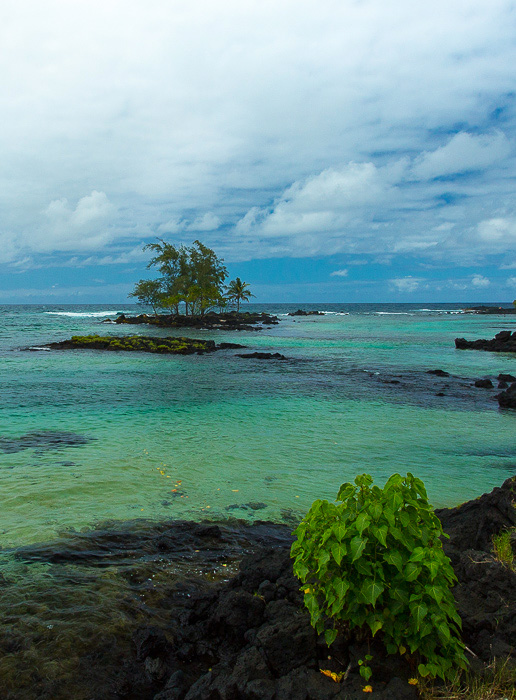
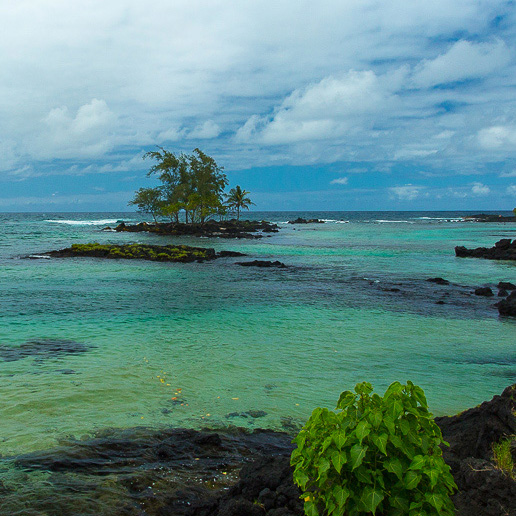
Here is the resulting photo, slightly cropped. There’s that rule of thirds popping up again!

This photo has a lot going on. I only had a split second to capture it so there was no time to carefully compose.
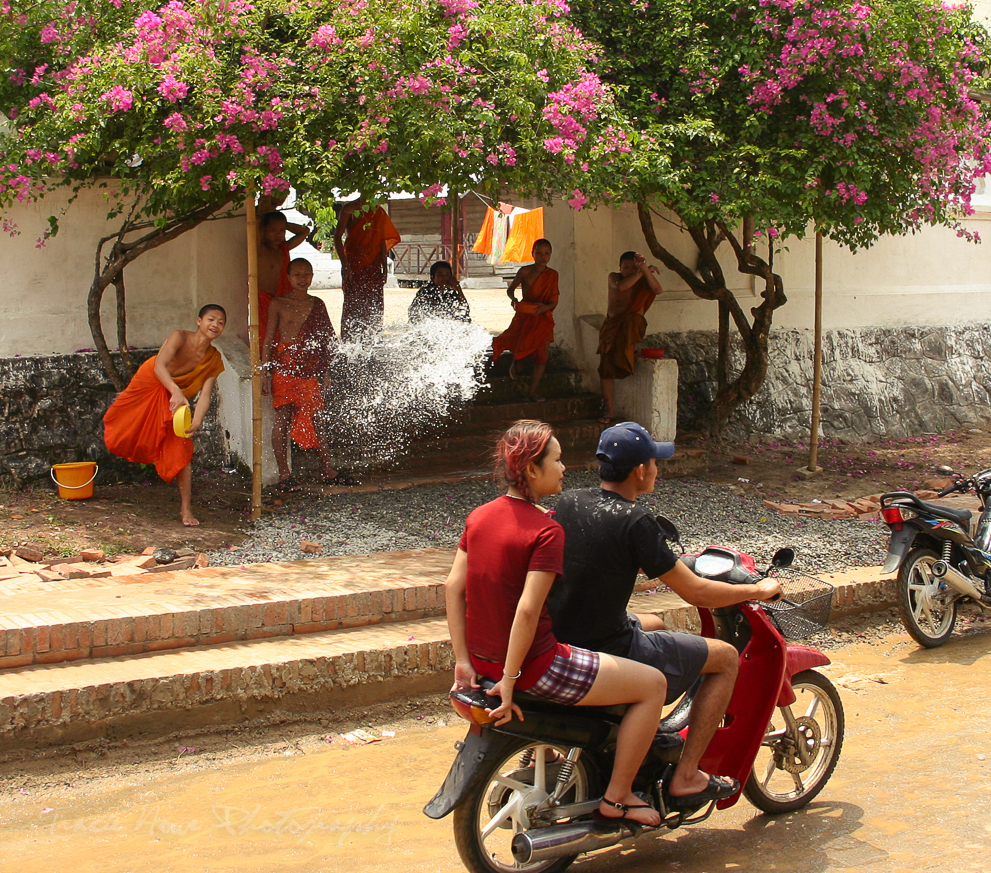
I cropped in more than I would have liked, but I think it improves the photo by zeroing in on my intended subjects. I went with a square crop because that’s the only one that would work for this scene. I would be even happier if that parked motorcycle wasn’t there and if I could have given more room in front of the scooter, but sometimes a perfect moment is more important than missing it because of small details that you can’t avoid.
• Exposure Adjustments – Every editing tool will likely have a way to lighten or darken an image. Ideally you will only need to slightly adjust these settings, but sometimes photos are just a bit too dark or a bit too light. In most cases you can recover a tad more detail in shadows than in highlights, so it’s always better to slightly underexpose if you have the option when shooting. If you are editing a JPEG, be aware that you won’t be able to recover as much in the light or dark areas as you would be able to with a RAW file.
If photos are too dark, you may lighten them, but be aware of noise (unwelcome graininess) that may result if you do it too much. Given the right tools, you may be able to bring up only some of the darks. In Lightroom you can adjust the overall exposure, the shadows, and the blacks. If the photo is way too dark, you will not have any detail left in the dark areas to lighten.
If photos are too bright, you might be able to recover some of those lighter areas by bringing the exposure down. In Lightroom you can also adjust select lighter areas, including the highlights, whites, and overall exposure. If you’re having trouble with extreme highlights, try adjusting the temperature of the photo to be slightly more blue. I’ve noticed that this will give you a tiny bit more highlight detail.
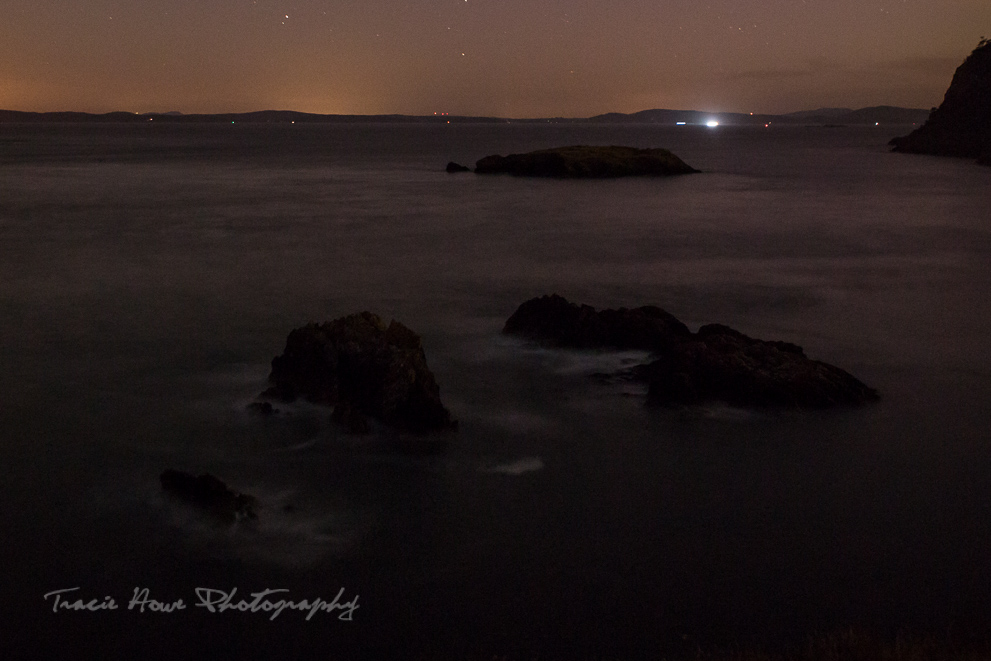
Here you can see that the foreground is too dark to be usable, even with edits as you can see in the next photo.
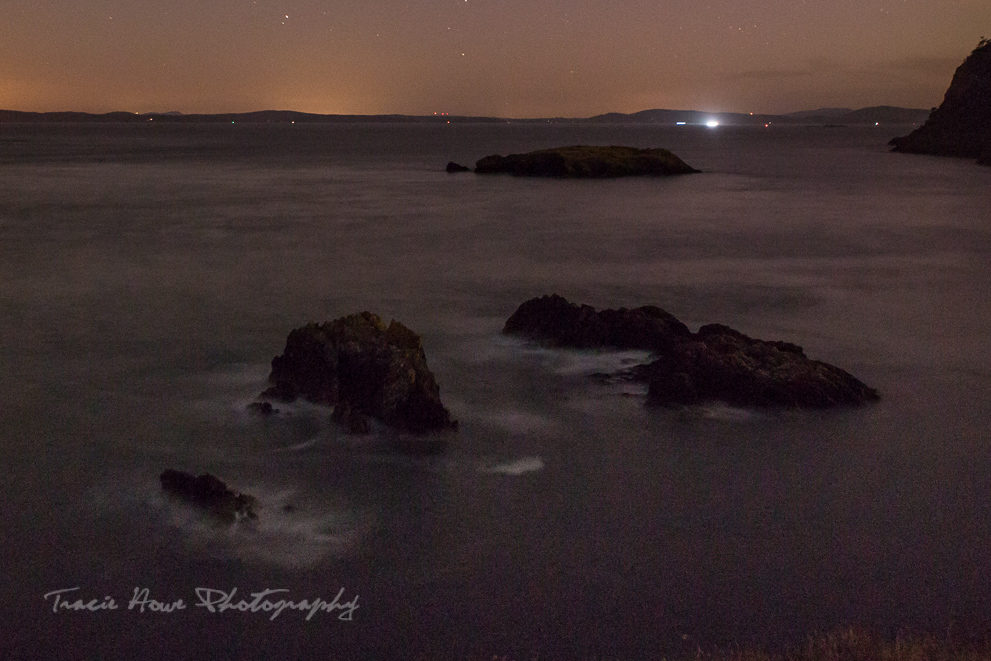
Lightening this photo too much gives me very noisy results, so I would never use this photo… except when demonstrating editing of course! ;)
• HDR – Sometimes a photo may have too much of both lights and darks, in which case you might use HDR. HDR stands for High Dynamic Range. All you need to know about this is that it’s a process combing the best of multiple exposures to achieve an image resulting in a balanced exposure. I’m not a huge fan of HDR, but sometimes I find it necessary. In those cases I try not to go overboard which is very easy to do with HDR… I see it way too often!
To achieve HDR, you have two options:
- If you have a camera that lets you choose your exposure settings, you can take 3+ exposures (one light, one medium, and one dark) of your subject. I will explain this briefly because I didn’t cover it in my DSLR settings post… You have to be careful to maintain the same composition before attempting 3+ shots of the same thing. If you move much at all, you won’t be able to combine the exposures later. The best way to do this is to use a tripod for consistency and to avoid moving objects if possible. You can manually change the shutter speed to get each light, medium, and dark exposure, but be sure to take the photos in quick succession. Or if your camera has the ability, you can automate the process. I can do this with my camera in the Exposure Compensation/AEB menu setting. After taking at least 3 shots with different exposures, you can use any number of HDR editing programs to combine them in post-processing. I use Photomatix.
- If you do not have the ability to take multiple variable exposures with your camera, then this may be one of the few cases where I would recommend “shooting in HDR” as opposed to editing later. You probably have this tool built into your phone. I’ve found that the HDR results from my phone are so-so and work about 30% of the time anyway, but it’s at least worth a shot (or three).
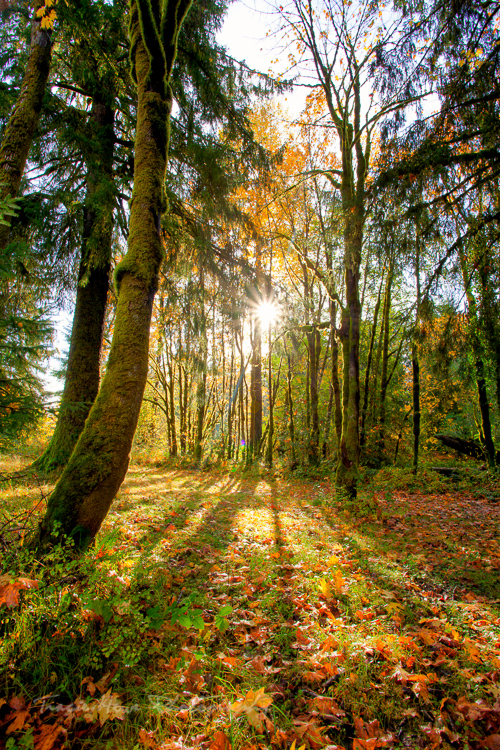
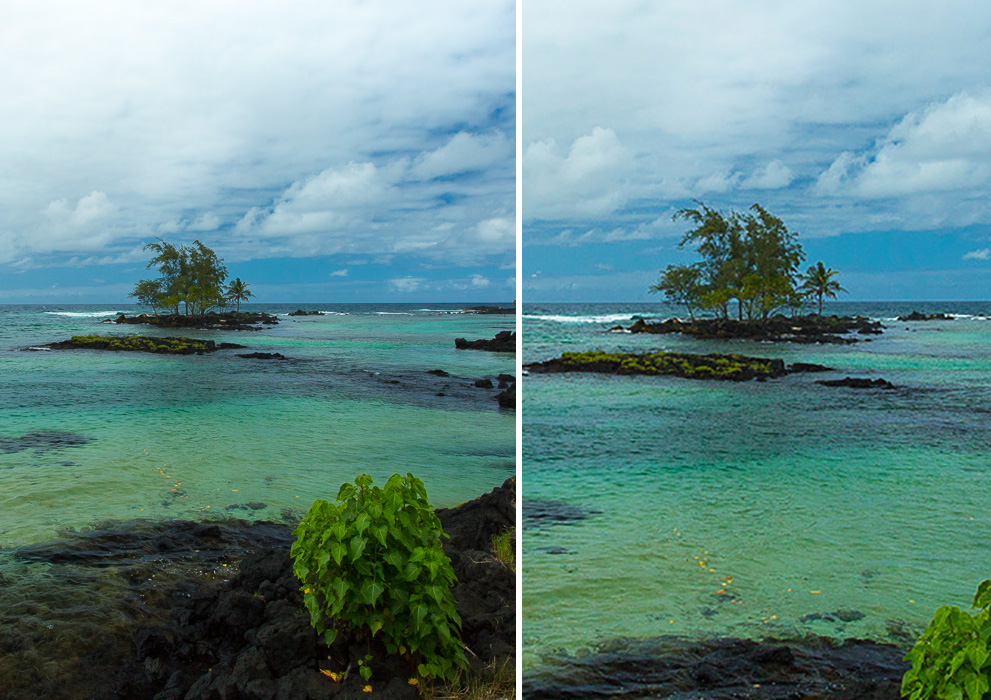
• Saturation – I will almost always add a little saturation to an image if it is a landscape. This can bring out the green in the trees and the blue in the sky. Again, I try to be very careful not to over-saturate, because this is easy to do. As a rule, I try to match the scene I saw with my eyes. One trick in Lightroom is to use the Vibrance tool more than Saturation. This will, as you might suspect, make the image more vibrant. Saturation tends to push oranges and reds more than other colors, but Vibrance is basically the same effect with less intensity.
I will sometimes under-saturate photos of people, especially close ups. Since there are often orange tones in most skin colors, saturation may push these oranges too much.
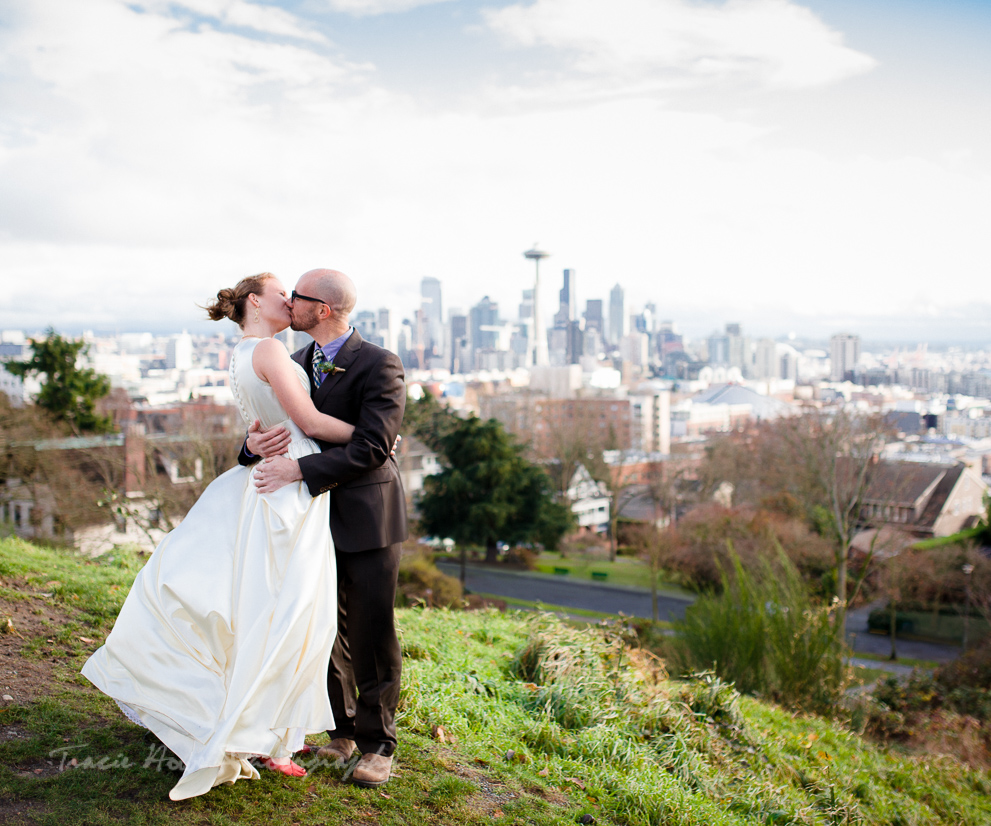
In this photo I took out some saturation because their skin would have otherwise been too orange.
• Contrast – Contrast should also be used with care. Adding contrast can give an image a little more depth that it might need. If the photo is a portrait, I may not even touch the contrast. In fact, I might bring it down a bit if I want to slightly soften the difference between lights and darks.
• Sharpness – Every editing program or app should have a sharpening tool. Some may even have a second tool that does something similar. In Lightroom, I prefer adjusting Clarity over using the Sharpening tool, but they are slightly different. In Snapseed I prefer Structure over Sharpening, but again they provide slightly different results. I recommend playing around with whatever tools you have available, and again, take it easy!
• Temperature – I haven’t gotten into White Balance (WB) too much in these posts, but WB is a setting that your camera may have available. If it’s not a phone, it probably does have this option. My suggestion is to play around with the different WB settings for different lighting scenarios (florescent, cloudy, sunny, etc.). When you can’t get it quite right straight out of the camera (SOOC), then you should be able to change the temperature in most editing programs.
Again, Lightroom is my tool of choice and it has a good number of ways in which to improve weird color. Some still confound me, but there are enough to play with to keep you busy for hours until you have the color that you’re going for. You can adjust everything with sliders or by entering numbers manually. You can even adjust the colors of the shadows and the highlights separately, which is a feature I have come to love. I actually discovered how to use that after buying some presets for Lightroom and learning how they changed the settings. If you just cannot get the temperature of a photo right, I recommend trying out some presets that will adjust color temperatures for you and then tweaking them as you like.
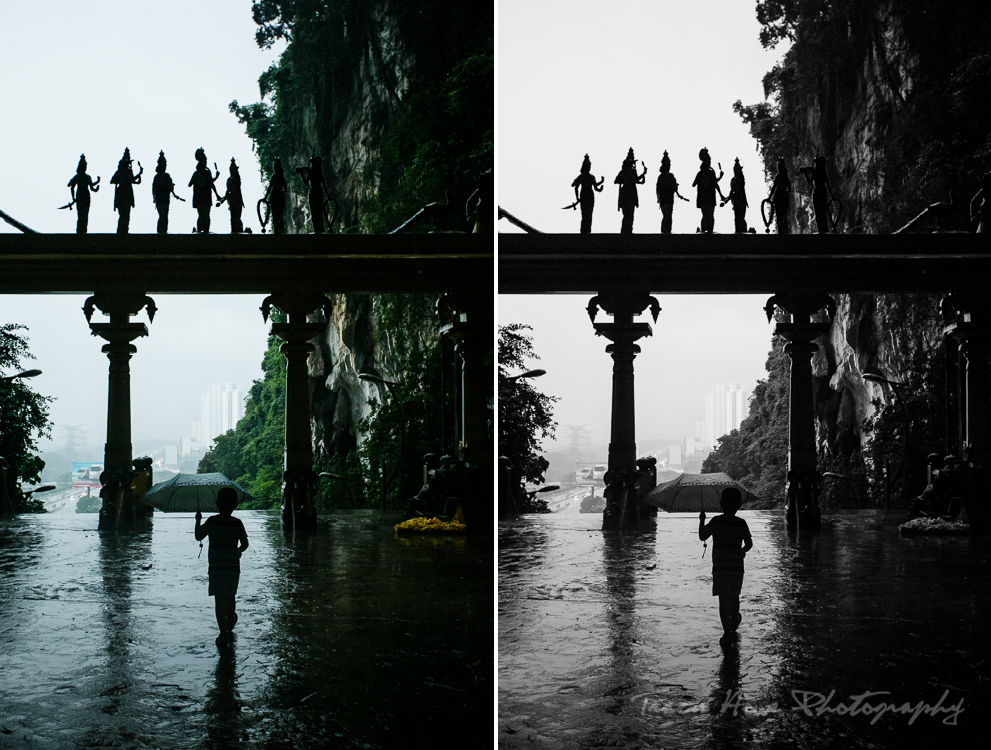
• Black and white – As photography lovers, we’ve all probably drooled over a black and white photo or two (or hundreds). A black and white conversion can add drama and beauty to an otherwise so-so photo, but it can also improve one that has other issues. All light has some color, but not all of it is flattering. A human subject surrounded by green grass and leaves will have green light reflected onto his or her skin. And we all know how gross florescent lights can make us look. Even if you choose the best WB setting, sometimes you just can’t avoid capturing that nasty color on camera. You might try simply changing your image to black and white to see if that improves it.
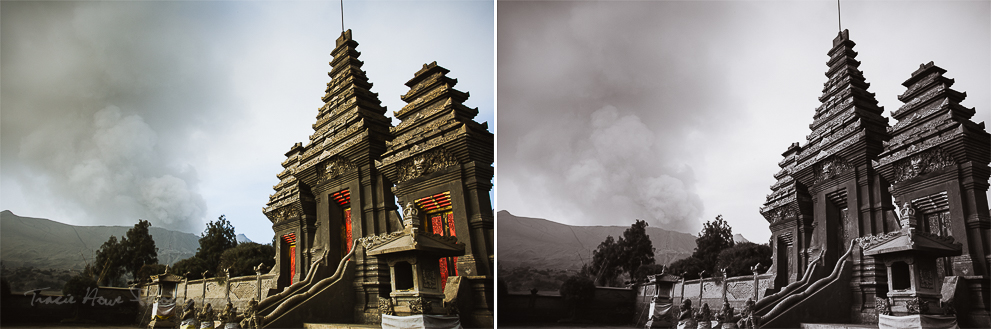
There’s nothing wrong with the photo on the left, but there are some weird colors going on there, especially on the temple. Sometimes a combination of the color of light and the color of a surface can create gross colors. Turning it to black and white takes away the distraction of ugly colors and can often make a photo more dramatic.
In addition to fixing color problems, converting to black and white may also help with photos that are too visually busy. Sometimes a scene can look a little crazy with too many colors and too much going on, so changing it to black and white can bring the focus back to the intended subject.
This isn’t the perfect example, but you can see how the little bit of extra colors in the original scene can be distracting. A black and white conversion is an easy fix for this photo.
How NOT to edit
• The best advice overall that I can give you for editing a photo is to save the editing for AFTER the photo is taken. Just because your camera, camera phone, or app has the option to shoot in sepia, with a filter, or in a square format, that does not mean that you should use it. Chances are you can apply the same effects afterwards.
If you do “pre-edit”, you are stuck with the photo that way until the end of time. There is no going back. Even if you zoom in too much, you may be compromising the quality of your photo when you could just crop it later. If you have the option to zoom in, just make sure you’re using an Optical Zoom, as I mention in this post.
• Please avoid over-saturating your photos. I know it’s tempting to bring out those beautiful blue skies or make that sunset seem just as remarkable (if not more) as you remember it being in person, but it’s not necessary. You are just going to make it look gaudy and fake. It’s always better to try and improve your camera skills than to make it appear that you are a good photographer after you’ve taken the photo. This is probably the number one mistake we photographers see amateurs making, and it’s a dead give away that you are not a pro photographer. I’m not saying you should never bump up your saturation, just please try to reign it in.
• This brings me to the second most common mistake photographers tend to make in the beginning – over-use of HDR. Again, this doesn’t mean you shouldn’t use HDR, it just means you shouldn’t push the limits of HDR too much.
• I only mentioned saturation and HDR above because those are very commonly over-used, but it’s certainly possible to over-lighten, over-crop, and over-sharpen, for example. Just take it easy, okay?
Sizing and Saving
It’s ironic that I started out this series with my main intention being to help people with sizing and saving, but here it is at the very end of the series. Anyway, this is a complex subject because there are so many outlets where your photo can end up. It’s an important subject though, so listen up! These are the things you need to know before you save your next photo:
• The way you save your photos could destroy them! I hope that got your attention, because this is something a lot of people don’t know. I certainly didn’t know when I first started out with photography, and I’ve got a lot of potentially great shots that are permanently ruined just because I saved them wrong. I’ve mentioned a few times that RAW files are more forgiving when it comes to editing. This is not only true for how you can edit, but it makes a difference in how you can save them. Saving JPEGs is all fine and good if you don’t do it more than once or twice to the same image. The more you edit, then save again, the more the image will start looking… crappy. This is especially true for lower quality images, like phone photos.
Here is the original edit of a photo exported from Lightroom as a JPEG. This was originally quite a large file, but it has been cropped for this example. The following examples would look worse if I had shot the same image with my phone or a lower resolution camera.
Here is the same JPEG with a few new edits within Photoshop and saved again as a JPEG. It was actually sharpened a bit, so it almost looks better, but you can start to see some graininess in the blue sky.
Here is that last Jpeg reopened and cropped for Instagram. The difference is slight, but it’s starting to look worse.

And here is the last JPEG reopened and resized bigger to fit into a blog post. This is probably the WORST thing you can do to a JPEG! If you are going to crop and resize, make sure you work on the original file and save it as a unique edit.
Finally, here you can see the original JPEG next to the last photo that has been saved again.
One of the advantages of using certain editing programs is that you have more flexibility with saving too. In Photoshop you can save an image as a PSD or TIFF, which are non-destructive files, unlike JPEGs. You can re-edit and re-save a PSD file over and over again with no fear. In Lightroom, you can export as various file types but this is not quite the same as saving because it keeps the original in tact. You can export as many times in as many ways as you want, all the while working on the original photo without making permanent changes.
You can even apply exporting presets for all of your social media platforms and other places where your photos are destined. For example, currently both my Instagram and Facebook presets in Lightroom are exported at 2048 pixels on the longest side. My horizontal blog photos are sized at 991 on the longest edge and vertical photos are exported at 750 on the longest edge. Pinterest “pinnable images” are exported at 1102 on the longest side.
• And that brings me to my next point… know what your photo’s destination is before you save or export it. You may have noticed that when you upload a file online there is sometimes a suggested size of X pixel width to Z pixel height. If you ignore this you risk not only a funny crop, but possibly a degraded image. If your photo is not big enough it will be stretched or made to look like that last photo above. Making a JPEG bigger than it was is a recipe for disaster! If it is too big it will be downsized, which is sometimes okay but not always ideal. It’s always good practice to take the recommended size and apply that to your photo (maybe noting the pixel dimensions you used in the file name of that version).
• Resolution matters! Well… it can matter. It really depends on the destination. If your photo is to become a print, save it at a higher resolution. 300 pixels per inch (ppi) is a typical printing resolution. Sure, you can put a 300 ppi resolution photo on your blog, but that will be unnecessarily big. Your blog will slow way down with such a big photo, especially if every other photo there is just as big.
On the flip side, a resolution of 72 ppi is recommended for pretty much anything on your computer or the internet, and should not be used for printing. Remember to find out the size recommended for every destination. Even within Facebook there are a variety of sizes for anything you might want to do, from your cover photo to an ad you create. If it’s your blog, figure out the maximum width and save at a 72 ppi resolution.
Final Notes
If you’ve made it all the way through this series, then I am impressed! I am also proud, because that means that you are serious enough about photography to take it to another level. Even though these posts are long and packed with information, I know that there are things I haven’t covered.
If you want to refer back to any posts in the series, here they are:
Introduction Post – 13 Non-technical Photography Tips for any Camera
Part 2 – Point and Shoot Cameras
Part 3 – Intro to DSLR Cameras
Part 5 – Desktop and Mobile Editing
If you ever have any questions regarding what I’ve written or about something I’ve missed, please don’t hesitate to ask me in the comments! Perhaps your question and my answer will help someone else too. With that said, now I have some questions for you…
What did you get out of this series? Did you get the answer you came for? What else do you want to know? What more do you want to see from the Tracie Travels blog? If you like what you’ve learned here, please share it with the world! :)
If you would like to try out Adobe Lightroom or Photoshop with a Creative Cloud subscription, then please follow the link below. At no extra cost to you, purchasing through this link will help support Tracie Travels!


heather - Good tips.
traciehowe - Thanks Heather!
Jennifer - Thanks for sharing this. I am going to download the Snapseed because I need something to use like this for editing.
traciehowe - You’re welcome, Jennifer. Snapseed is pretty great!
Chris - Thanks for some more great tips Tracie, although a bit of it is still way out of my league ;-)
traciehowe - Thanks, Chris! I bet you can use some of it. Don’t you edit your photos? I have noticed some interesting filters/editing on some of yours. Some would call it a miniature look. How do you do that?
Lisa (Klipdrifters Travel) - So many awesome tips and apps that I didnt know about, thank you! Love snapseed!
traciehowe - Thank you Lisa! Glad to help. :)
Thuymi @ www.AdventureFaktory.com - Great pictures, your crops did change the pictures completely! VSCO is my go to, no more time for photoshop and Lightroom and do photo by photo, i paste my own customize colours to all and export all within 10 minutes. Only specific pics for photography I would go play in Lightroom!
traciehowe - Thanks for your comment, Thuymi! VSCO is great, but I don’t use it often. I didn’t realize you could apply your settings to all photos within the app. Or do you mean the VSCO Lightroom preset?
Jennifer - Great information to use on my blog! And for editing photos in general Thank you!
traciehowe - Thanks for your comment, Jennifer! You’re so welcome!
Evan Kristine - Oh wow! Great tips and thanks for sharing them. I personally abuse photoshop big time to edit my photos, it has been my ultimate favorite. It must have taken you a great amount of time to write this and your efforts are greatly appreciated!
traciehowe - Thank you, Evan. I appreciate that comment. I used to use Photoshop exclusively until I started editing weddings. Handling a huge chunk of photos is why I use Lightroom the most, but Photoshop definitely has it’s place in my workflow!
Vyjay - Very interesting read indeed. Liked your tips on editing. It is great that you have explained with the help of photos before and after editing. This gives the reader an overview of the results he can expect.
traciehowe - Thank you, Vyjay!
Kevin Wagar - Awesome tips and fantastic photographic examples! I totally agree, Lightroom is a lifesaver!
traciehowe - Thanks, Kevin! Yeah, I <3 Lightroom!!
Jenn and Ed Coleman - Great article. I will have to check out screen calibration. We keep putting pictures up on Instagram that are darker than they appear on our screen. Does this ever happen to you?
traciehowe - Thanks, Jenn! No, this doesn’t happen to me. I think the screen calibration could be the reason if you ever edit your photos on your computer. Do the photos look dark when you have them on your phone? Before you post to Instagram? If not, then maybe you’re experiencing a bug.
Shawn Michaels - Wow! Such an informative post. I like it quite much, there is so much to read through here. And the tips are awesome. Thanks for sharing an amazing information with us. I just want to give a thumbs up for your great and absolutely outstanding work.
traciehowe - You’re so welcome, Shawn! Glad you enjoyed the post.
zoyoyayep - I think it’s perfect tutorial. Nice photo editing tips for both newbies and expert level.
traciehowe - Thank you so much! I’m glad I could help a range of people.
Richard V. Woods - This is an awesome tip! I have never heard of this before! I can’t wait to give it a try!
Behind every great photographer is a full bag of tricks. If you want to take better pictures, it pays to glean what you can from the professionals.
And thanks for sharing your knowledge regarding this.
traciehowe - Thanks for your nice comment, Richard! What tip was it that you liked?
Morris Edwards - Hey!
I just go through your series and they are fantastic! I am just starting my business, do not even have a website yet. Thank you for all the help you are giving me, it is exactly what I was searching for.
traciehowe - That’s great, Morris! I’m glad you found the series useful. Best of luck with the new business! Let me know if you have any questions.
Heather - Great post! I never realized that calibrating your monitor would help with its appearance on different screens. Thanks for these tips!
traciehowe - Thank you Heather! I’m glad you got something out of the post! Unfortunately, the ability to calibrate screens means that people with non-calibrated screens are never seeing your work as you intend it to be seen. BUT, at least they are seeing everyone’s work that way! ;)
sai vivek reddy - Great post! I never realized that calibrating your monitor would help with its appearance on different screens. Thanks for these tips!
traciehowe - Absolutely! Thanks for stopping by!